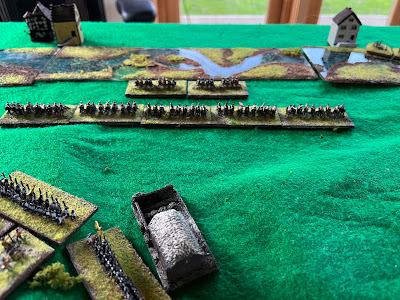
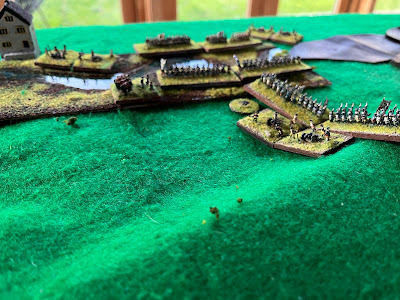
Finally. Finally I got down to it at 2:30 after being Shanghaied into booking a holiday. I played until around 6pm when I stopped for dinner (still hot enough to eat outside) and then went back 7-ish to finish off. It only needed one more turn to reach a conclusion. Technically the game didn't reach a conclusion but it was only going to go one way after that and it would have been a bit of a slog to get to a game conclusion.
So four hours in total, which involved a fair amount of rule checking. I realised after a few rounds of combat that I had been doing it wrong, despite having played with these rules a few times before! The error involved me testing both sides reaction to combat, whilst I should have only been testing the 'passive' (non-phasing) side. Doh! In that four hours I managed 25 turns. So 10 minutes a turn.
I'll let the pictures (plus captions) tell the story.
 |
| Turn 5: Ziethen's reserve hussars and Schwerin's columns (foreground) attempt to outflank the Austrians. In the middle distance the Austrian right wing led by von Browne redeploy to seal off the flank. It took three turns to activate Browne's wing, but they had the advantage of interior lines. In the background the Austrian left and reserve shift to the right. |
 |
| Turn 8: Schwerin's infantry begin to cross the Rokenitzer Bach in a co-ordinated fashion. The Austrian redeployment looks like it will be complete in a timely fashion. |
 |
| Turn 9: the new Austrian position is ready. |
 |
| Turn 12: Schwerin's men slowly advance after shaking themselves into proper lines. In the meantime the Austrian left has already lost a brigade to fortuitously accurate artillery fire. This allowed Bevern to deploy unhindered. |
 |
| Meanwhile: Ziethen's hussars (L) and Schönach's heavies (R) charge into their opposite numbers. Ziethen is facing off against the redeployed Austrian Reserve under Hadik. |
 |
| Turn 20: Several turns later, the Austrians have lost some infantry but their cavalry and reserve (mostly lights) hold their own. The infantry battle is slow to get going because the Prussians failed several activations. Combat between the opposing foot lasts several turns without major losses. The Prussian fusileers, who I decided would be classed as Trained but Wavering (i.e. two morale failures rather than 3 would eliminate them). |
 |
| Close up of the previous picture |
 |
| Bevern's men have finally broken through Kheul's left infantry, and advance on a battery. This was probably the crisis point of the battle. The Prussian left wing had delayed crossing the Rokenitzer Bach but then advanced to keep the Austrian left wing cavalry and an infantry division pinned, whilst Bevern broke through. The Prussian artillery on the left also did good work keeping the Austrian cavalry at bay. |
 |
| Turn 22: Zithen's boys have taken a hammering. They became the first 'wing' to have to take a wing morale test. They passed it twice before fleeing. |
 |
| Turn 25: Suddenly it all happened. The dam broke. Schönaich beat off the Austrian heavies and ploughed into the infantry. 3 Austrian brigades broke this turn, each rolling adjusted scores of 3 or less on 2D6. Then von Browne's wing broke on failing its Wing Morale test. |
 |
| Schönaich and Schwerin have finally crushed von Browne's wing. |
 |
| View of the Austrian left with the Prussian right wing advancing up the ridge. |
 |
| A gap is torn in the Austrian line between Hadik's Reserve (left middle ground) and the battered Austrian Left Wing. A powerful column of Prussian infantry is ready to advance into the gap, but there will be no pursuit - both sides cavalry are fairly evenly matched and it has been a long day. |
 |
| Austrian losses: 20 brigades |
 |
| The Prussian toll: 9 brigades |
So in the end a relatively ahistorical result, in that the Austrians suffered many more losses than the Prussians. A more decisive victory, but not one big enough, in my opinion, to lead to the fall of the Bohemian capital. Two other notable differences from history. Schwerin wasn't laid low by a shower of canister balls, and, David-in-Suffolk will be glad to know, von Browne lived to fight another day. Assuming the tuberculosis didn't carry him off.
A few quick observations on why the victory was more decisive than history. The Prussians were able to co-ordinate their attack better than they were able to historically. Maybe the scenario needs tweaking slightly to prevent or discourage this, possibly by leaving longer gaps between the arrival of the successive columns, or setting a limit to the number of game turns. The Prussians were also able to keep some of their artillery in action. The Austrians' guns barely got a shot in. With the rapid redeployment, the Austrian guns got stuck behind the infantry. Moral: leave more gaps for the guns. On the plus side for the Austrians, they did manage to seal off the area west of Sterbohol very well, with horse foot and guns. There was to be no repeat of Ziethen's winning charge into the Austrian heavies' flank.
In terms of numbers and quality of troops, the Prussians had 33 brigades to the Austrians' 30. Traditionally, the Austrians are credited with having more troops than the Prussians. I suspect this might be because assumptions are made about the strength of battalions and squadrons. The Austrian paper strength is higher per unit. I've used Duffy's numbers from his later works. For these he did extensive research in the Austrian archives. My belief is that these are more reliable. The Prussians also have the advantage of more elite infantry, though on the negative side, I rated their Fusileers (30% of the total infantry) as Wavering. They didn't get into action in the game. If the Austrians had broken the front of the Prussian infantry maybe the Fusileers would have collapsed quite quickly and that would have been the end of the Prussian Left Wing, and the second decisive Wing failure.
My key take away from this, is a reinforcement of my original thought that it is difficult to get the scenario right for this battle. It would probably take several play tests to get right. Maybe someone else can build on what I have done, and tweak and refine it. There are also options as to when to start the clock. One final comment: I didn't have enough space for Ziethen's envelopment on the southern side. To get round this I took his column off table and diced for the number of turns before he would reappear where he arrived historically. Ziethen arrived after five turns to find the Austrians had built and effective barrier that eventually did for the Hussar King.


Looks good and only ten minutes a turn. I take it you are liking these rules?
ReplyDeleteLove em. If I wasn’t playing solo it’s probably take a bit longer per turn as I’d probably think a bit more before each move.
DeleteGreat batrep matey. I always find a slavish recreation of what actually happened to be a bit boring, so top marks for a different and interesting outcome.
ReplyDeleteThanks old fruit. Coming from you that’s praise indeed.
DeleteIt’s tricky knowing where/when to start with a battle like this. If you start too early it could be any big bash. Start too late and the die is cast with no room for manoeuvre.
Looked and read very well and seems like all your research paid off - I really thought the Austrians might manage to hold out! The small scale figures are ideal for fitting these huge numbers of troops onto a viably sized table too.
ReplyDeleteAt one point it looked like they could hold out.
DeleteI think there were about 2000 figures on the 8x4 foot table, with plenty of space to move.
Excellent looking game, the river sections work particularly well, always difficult to achieve an historical result, sounds like plenty of interest and the Austrians almost did it!
ReplyDeleteBest Iain
Blogger is playing up in a new way. Steve J made a comment but the publish button has disappeared. Anyway here is Steve’s comment:
ReplyDelete“Splendid work there Chris and well done on fighting through so many Turns in a game. Your post game thoughts are interesting and I've learnt to my cost in SYW games that you need to get the artillery into position early, before the infantry. If not, then you can spend most of the game trying to rectify this, which is often very hard to do. I think this scenario along with other 'classic' battles, often takes maybe 3 or more play-throughs until you are happy with things. As you say, if the Austrians had managed to cause the Prussian centre to begin to break, then things might have turned out differently. In my latest game, I feel there is plenty of re-playability in the scenario in terms of deployments, timings of reinforcements, but also the OOB involved.“
Chris, glad you salvaged Steve’s post. I agree with on Artillery placements and scenario replays.
DeleteI think my earlier attempt at posting on your BatRep disappeared into the ether.
Yes. Normally the defender has the advantage with artillery as once the attacker gets moving his guns get masked. The need to redeploy to the flank messed this up for the Austrians.
DeleteChris