This afternoon I ran through the scenario twice with similar overall results each time. The second time I adjusted things slightly. Of that, more anon.
For the first run-through I made some adjustments to Steve’s scenario. First I used the Staff Ride map for the game, with Germans due to appear on the extreme right of the American line, and Acland’s British grenadiers on the extreme left of the American line. Secondly, the Staff Ride map shows the situation later on from where Steve starts his and the crossing of the brook (off table). I did this because with my ground scale of 1mm per yard on an 8x4 foot table* I couldn’t fit everything in otherwise.
* being a Brit, I will flip between Imperial and Metric measurements at the drop of a cocked hat.
As Steve had the Germans appearing from turn 7 of 9 and my game started later, I started dicing for arrival from turn 5. Ditto Acland. These troops would arrive on a 5 or 6, with the odds improving each turn.
Each turn the commanders got 1 AD plus 1 Command Points. I gave the Brits the initiative each turn, but moves etc are simultaneous in Loose Files so it’s not an overwhelming advantage.
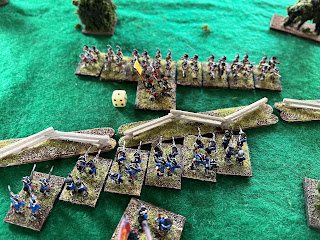
During the first game I forgot to take pictures for the first few turns, so they start part way through. The British Lights snaked their way forward in route column, with 24th opting to deploy. Any formation change (or indeed wheeling) causes a Disorder Point in Loose Files so it’s always about striking a balance between speed and order.
The 11th Mass in the centre and the NH infantry on the right opted to about face and march to the other side of the fence/road to avoid being beaten up or cut off. These manoeuvres are risky as they cost time and Disorder, but the Americans had sufficient time on their side as it turned out. Movement speed is variable in Loose Files so it might have proved disastrous. It was probably worth the risk as the Lights were in route column so whilst faster, they would lose a turn deploying to fight. Warner’s Green Mountain Boys (blue on my table) faced off against the 24th.


A great little action and seems to read like the Wikipedia summary of the real thing...a British tactical victory but an American strategic one! How did game two vary....or is that the next post?!
ReplyDeleteAh, yes it’ll be up later in the next post. I’ll write it up after the football (Forest v Liverpool, not the Blue Riband event it used to be but still ….)
DeleteA nice little action here and with the follow on game too. Glad to see two wins for the British:). BTW, what rules were you using?
ReplyDeleteI remember one Forest vs Liverpool game in the '70's or '80's being an absolute classic, with plenty of goals IIRC.
Thanks Steve. This one ended with just the one goal. Not a classic sadly.
DeleteGood to see your collection in action. Did the small number of BMUs allow luck to play a larger role than it would in a larger battle? Casualties look light.
ReplyDeleteIt probably did Jon. Relatively few dice rolls for close combat, with very little ranged combat (shooting). Arrival of the flanking forces was also governed by dice. Then every move is dice adjusted. Finally the commanders' Command Points are also governed by dice rolls. So a fair amount of dice rolling ought to even out luck somewhat, but at the cutting edge of battle a few dice rolls had a big influence.
DeleteMaybe for an action of this size 1,000-1,200 a side, the units ought to be broken down into smaller sizes. Wings rather than battalions. That might work better and give more ebb and flow. There's probably a paper to be written on the ideal number of BMUs in a game with certain rulesets. Keep the number of BMUs fairly standard but adjust the unit size?
late to the party here, but now reading this post makes my feeble mind better understand your "Hubbardton Take 2" post. Sound like solid changes and, interestingly, is the way I used to play this battle (with the Grenadiers' flanking maneuver completed and the British front established across the battlespace). I might play again with your modifications. would make the game feel like less of a meeting engagement :)
ReplyDeleteTo be honest, I wish I had taken your approach of starting the game earlier in the action like you did. I think there would have been more jeopardy. It could be played as a pair of linked actions. Rather like a two-legged football (soccer) match. The initial action by the brook influencing the next stage on the open ground.
Deleteit certainly created the tension I was looking for in starting the game at the "jumping off point" for the British as the British have much to do in order to get their objectives met.
Delete