Sunday, 3 May 2020

Progress on the Lead Pile...but it grows

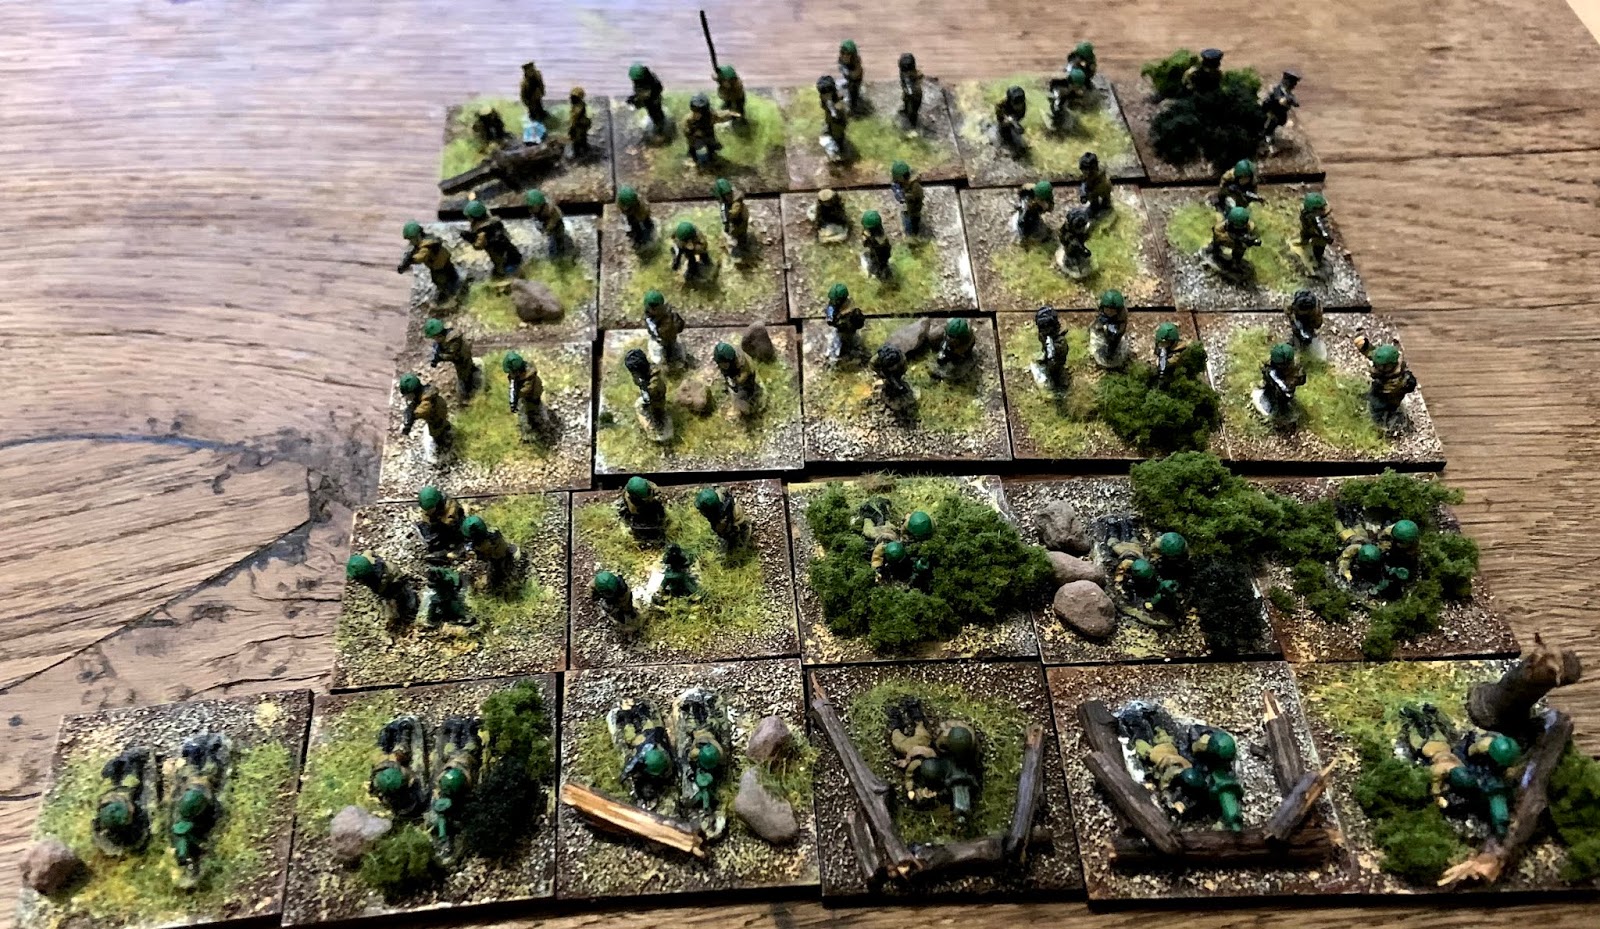
Finally the Soviets and Finns started at Easter have been completed following a quick forage for twigs.

The evil occupiers/liberators of Eastern Karelia


The liberators/evil occupiers of Eastern Karelia. You can clearly see the differences in size of the different makes here.

The whole lot. Enough for a decent game.

I still have quite a lot to do on the list which I posted a while ago. Since the original posting the list has grown and despite ticking off a number of items I have more work outstanding than I had two weeks ago. The biggest task is number 7, but I can't see anything being done on that for a good while yet as I want to get more games in first. After all gaming is what it's all for. 
  1. Finish ECW 'clubmen'.Complete
  2. Texture ECW casualty marker bases. Complete
  3. Finish ECW musketeers. Probably at least a regiment's worth. Maybe have as firelocks? Complete
  4. Finish ECW command figures. A few to paint and texture bases. Complete except for His Maj and Warty Nose to paint.
  5. Finish ECW odds and sods, e.g. limbers and gun crews. Limbers and horse teams done. 
  6. Paint bridges. Complete
  7. Finish AWI. Quite a few Brits done but no Yanks. Brits need cleaning up too.
  8. WWII Finns and Russians (10mm) - lots of infantry and AFVs. Completed infantry
  9. Touch up and base 6mm siege train, pontoons and transport. 
  10. Paint and base Baccus 6mm cattle/bullocks
  11. Base Leven hedges so they don't keep falling over. 
  12. Finish 6mm gabions. Complete.
  13. Paint and texture bastions (3mm scale).
  14. Paint and base new ECW horse, foot and mounted officers. Complete
  15. Paint and base ECW petardiers and labourers.
  16. Paint Leven town walls.
I'd love to get some AWI action on the table but before that I have a FaceTime game on Friday (a Napoleonic scenario) and a playtest of IDV to do.

Due to all of the above I have decided to put on hold any thought of doing an 18th century Dutch army. There's just too much to do - I'd need to build a French army at the same time. That has got some attraction (especially as it'll give Old Fritz AND the Queen of Hungary another opponent). But it's just too much to take on right now.

Friday, 1 May 2020

In Deo Veritas playtest planning - Newbury I

I’ve been casting around for a battle scenario to play test In Deo Veritas (henceforth’IDV’) and have settled on the First Battle of Newbury, 1643. It’s a large battle by ECW standards (around 14,000 a side) as IDV is aimed at the larger confrontations of the period. I didn’t go for one of the scenarios in the book as I’ve done one of them twice now (Cheriton) and I don’t have enough toys for the other one (Marston Moor). I haven’t properly checked, but I might not have quite enough for Newbury either. ‘Hey ho’ sings my inner cavalier. There is room on my table, however, to get the scaled down battlefield on at the official IDV groundscale of 40 yards to the inch.

I don’t have any of the books dedicated to the battle (there are quite a few tempting titles) so I’ll go with what I can find on t’interweb and my general histories like Wanklyn’s Decisive Battles or Scot and Turton’s Hey for Old Robin. This satisfies the ascetic in me, and avoids raised eyebrows with more books landing on the doormat. It’s also ‘just a playtest’ as I will tell the pedant lurking in my head.


It’s beginning to sound like I am fighting my own inner Civil War, with all these references to internal Puritans and Cavaliers. Is anyone else like that?

I’ll post my orders of battle later when I’ve crunched the numbers. As for timing, I’m not sure yet as I still have to properly plan the scenario for, and schedule the second FaceTime game with my son. I did think we had plenty of time this weekend as it’s a traditional Bank Holiday (public holiday) here in the UK, but when booking work calls today I came across the fact that the Bank Holiday has been deferred to next Friday to coincide with the 75th anniversary of VE Day. Most European countries get May Day AND a Victory Day celebration. Not us though. Despite always banging on about the War we don’t see fit as a country to celebrate its ending. Maybe it’s because in our insular heads it hasn’t ended. *

Gratuitous photo of some buildings just outside Richmond Park (on the Kingston Hill side).  They look vaguely 17th century to me, so kind of relevant.
A bientot. Mind how you go.

* I have Dolores O’Riordan singing Zombie in my head now having re-read that bit. “In your head, in your head, they’re still fighting.’

Tuesday, 28 April 2020

Making In Deo Veritas work with my toys

I was originally intending to tag this on the end of my post on the rules themselves, but I thought that post was already getting long and if you just want to know about the rules, you don't need me blathering on about how I'll make them work.

I will have to make a few adjustments in order to play the game with my current Pike and Shot armies. First up basing. I’m NOT going to rebase my toys unless IDV with 10mm figures becomes THE standard for ECW wargames. My foot are based on 40mm wide bases, with 3 to the battalia (Brigade in IDV). Horse are based on 30mm wide bases. To keep foot and horse units the same frontages, I could have 4 horse bases so both horse and foot are 120mm wide. Or I could go for foot units of 2 bases which makes them 80mm wide (as near as dammit to 75mm) but they would look ‘wrong’. Instead of it being Musket-Pike-Musket it would be Musket-Pike. I’d then have to decide whether to have horse units 2 or 3 bases wide (60mm or 90mm) - to my mind this would be too far from 75mm to sit comfortably with my pedantic* approach to scales.

I could just increase the ground scale so I have nice consistent sized unit frontages and adjust movement rates and shooting range accordingly. Then I hit the problem of movement distance. If horse move 18 inches in IDV this equates to 720 yards. 720 yards in my groundscale/basing convention is 72cm, i.e. 80% of the depth of my table.

I could just keep the ground scale the same and say that all my Brigades are just large**, and instead of being 120 yards they would take up (quick bit of maths)...192 yards. That 18 inch horse move is still long but it's 450mm or half my table depth but not catastrophically so. The number of dice rolls needed to inflict a hit is all relative anyway so the size that the unit represents doesn't really matter.

Instead of using coloured counters to indicate a unit's degradation (I prefer not to have things that aren't models on the table - quiet at the back!) I have two options. 
  1. Use casualty markers: 0 = Sound; 1 = Disordered; 2 = Disrupted; Routing is the unit going the wrong way.
  2. Use the facing of the unit command stand: forwards = Sound; facing the side = Disordered; facing backwards = Disrupted; Routed as above.


I want to come up with something a bit different from printed tokens for the Wing orders too. In my own rules I use the position of the command stand to indicate what the unit is doing: in front = moving; behind = holding. However this doesn't indicate what the overall order is for the Wing. And neither does it allow orders to be 'revealed' when that Wing's card is drawn from the deck. Once revealed the Wing order could be indicated by the orientation of the Wing commander:

  • facing the opponent = Advance; 
  • facing to the side = Hold; 
  • facing towards its own base edge = Withdraw. 

Maybe. For the 'hide and reveal' aspect one thought occurred to me. I have various pieces of 'clutter' like barrels and piles of roundshot. I could paste the order underneath the base then turn it over when required. Again, maayybe. More thought needed.

* I know it shouldn’t bother me, but it does. I like to keep ratios between shooting ranges, movement distances and unit frontages consistent.
** Horse units would then be 640-960 men strong, and foot would be 1440-1920 strong which for the foot at least is close to multi-regiment brigade sizes in some battles of the first Civil War.

In Deo Veritas - my take: so far

These rules (published this year by Helion and written by Philip Garton) are intended for full-scale battles in the 17th century. I guess they are really for European battles (including those involving ‘the Turk’) but could possibly be used for conflicts further afield, or even further back in time. The book is soft back with 118 pages.

https://www.helion.co.uk/search-results.php

I’ve included a couple of photos of extracts from the book. If anyone objects on the grounds of copyright I’ll happily remove them, but I don’t think they give much away in terms of IPR.

First I'll give an overview of the rules, then attempt to explain how they work, then give my personal opinion of them.

Contents of book

The book contains everything you need in terms of the ‘software’ to get started, as you can see from the contents list below.

To my mind introductions are an important part of any rulebook since they are an opportunity for the rule writer to explain the basic thinking, philosophy and aims behind the rules. IDV does this well in my opinion.


The six scenarios given are presented in a nice clear style with maps and orders of battle, whilst acknowledging that the information is not always available in the historical record, and that sources can be contradictory or unclear. Good to pick up and go.

'Playsheet' is what in some quarters are known as Quick Reference Sheets (‘QRS’). Also included is a page of order marker templates which you can copy and print - of this more later.

The Battlefield section contains a Terrain Generator for non-historical battles as well as describing the terrain features themselves. There is a touch of WRG about the terrain dimensions.

Game basics

They're generally intended for use with small scale figures, but this is about the look of the thing rather than being an essential requirement. Ground scale is 1 inch (25mm) = 40 yards. A turn is 20-30 minutes. They are not specifically aimed at gridded games, though they could probably be suitably adapted.

Armies are divided into ‘Wings’ (what might be termed ‘Battles’ since the centre is called a ‘Wing’ in IDV) and the basic game units are ‘Brigades’. There are also units of detached troops to represent bodies like ‘Commanded Shot’ or a Forlorn Hope.

The turn sequence is Orders, Movement, Combat. Combat includes shooting and then melee. During the Orders phase players issue Hold, Attack or Withdraw orders at Wing level by placing tokens with these words on face down by the Wing Commander. Turns are alternate by Wing and the order of movement is determined by the turn of a card from a shuffled pack with each card representing a wing. Let’s say there are 3 Wings on each side, Centre (C), Right (R) and Left (L), with Players 1 and 2. There will be 6 cards in the deck and if 1R is drawn first, Player 1’s right wing moves first and follows the Hold, Attack or Withdraw order it placed in the orders phase. If the next card drawn is 2C then Player 2 moves his centre according to the orders he gave earlier.

A foot Brigade is 900-1200 men which is made up of men from more than one regiment. I presume by the frontage of a unit (75mm or 120 yards in IDV) that in ECW terms this is meant to be a strong ‘battalion’, although it could be a multi-battalia brigade thought the depth is a bit tight. A cavalry Brigade is 400-600 men also on a 75mm frontage. The Marston Moor scenario in the book for example gives 29 brigades for the Scots-Parliament army so I'd go with battalia. Tercios can also be used - these are also single base gaming units but are twice the size as Brigades (same frontage but double the depth) and have appropriate advantages and disadvantages.

Classification of Generals: Politico, Normal or Experienced. Further sub-classified into: New Appointment, 2-3 Years Experience, Professional (4 years +). Politicos represent those, less competent, generals appointed because of who they were not because of their military qualifications. I like this idea, at least the main classification - adding an extra layer might just complicate things or add to the admin burden. A table is shown which presumably represent D6 rolls to select the characteristics but there is no real explanation. Possibly it entails two successive D6 rolls. There are also optional rules for Willpower and Heroes.

Units can move a long way each game turn - the slowest foot for example, Tercios, move at 10 inches (400 yards) a turn and cavalry Brigades move 18 inches (720 yards) so they fairly whizz around the board. Opposing cavalry Brigades can therefore be in melee after 1 or 2 turns at most.

Mechanics

Units are single bases of figures and there is no figure removal. Units are degraded through 4 steps: Sound; Disrupted; Disorded; Routed. Units can move back up the scale if ‘Reformed’. The book suggests using coloured counters, but there is no reason why you can’t make Brigades multiple bases and removing (or adding) bases accordingly if you don’t like ‘clutter’. Personally I would use the position of my command stands/casualty markers to illustrate unit state and orders as I’ve done with my own rules. Degradation happens through hits being inflicted by shooting, melee, terrain, being passed-through, or as a result of failing a Disorder Test. A modified D6 of 4 or more means the test is passed.

Shooting and Melee are both conducted (in the Combat phase) by rolling a certain number of D6 for each unit, scoring a potential ‘hit’ on 4,5 or 6. The number of D6 rolled depends on the circumstances - e.g. foot units with pikes get extra dice in melee against horse; disrupted units get a reduced number of dice. The other side then gets a number of saving rolls based on the type of unit and its circumstances. With shooting the number unsaved hits determines the effect on unit status (e.g. with 1 hit a Sound unit becomes Disordered). With Melee the number of hits scored are compared and the relative score determines what happens to each opposing unit (Stand-off, Recoil, Rout etc).  I like this mechanic because it means units’ effectiveness is gradually degraded and there is no record keeping - ‘bang’ and the status either stays the same or goes down immediately.

There is no distinction between ‘trotters’ and ‘gallopers’, though cuirassiers get an extra Saving Throw die.

At the start of the game both players roll a D10 and this might result in an ‘Event’. A further D10 roll determines what type of event it is and what the result is. These might either help or hinder a player. These are all nice and plausible but nothing will happen that means one player will find it impossible to win. I like the idea of random events that are outside the normal game mechanics. Having this done at the start of the game means it’s done and dusted, simples.

Wings may become ‘Fatigued’ in any turn when it has a routed unit. This is determined by rolling 7 or less on a modified D6 (i.e. high is bad). The Wing can then only follow Hold or Withdraw orders. If it fails another test, the Wing becomes Exhausted which means it must Withdraw. A further failed test means the Wing Collapses and all its units’ status is degraded, and the Wing must retreat the next turn. There's even a chance that the Wing Commander will shamefully leave the field rather than stay and help his men. A nice touch.

The effects of all this on the Army is tested at the end of each turn that it contains a Fatigued Wing (and presumably Exhausted and Collapsed). Failure in this test means the whole Army withdraws. To determine the sale of Victory if one side withdraws (both could withdraw simultaneously) a modified D6 roll is compared to a table of outcomes. 

On some occasions high die scores are ‘good’, on others high scores are bad. e.g. with the Disorder Test, high is  ‘Good’ and with the General Will test, high is ‘Bad’.  Personally I feel this is not helpful and would prefer keeping it consistent so a high die roll is always good and low is always bad - it helps those of us with failing memory (and let’s face it that applies to a lot of historical tabletop wargamers!).


Style/Presentation

Very good overall. Clear, good type face. Handy sized format in terms of page size. The book is written in a nice readable style. It’s interspersed with period quotations to illustrate some of the principles in the rules. Another nice touch.

The book has 4 pages of QRS. Once you’ve got the basic understanding of the rules you could probably play them just using the QRS. I say probably because I haven’t actually tested them yet. I haven't yet really scrutinised the QRS yet so check it all makes sense and is congruent with the main rulesThere’s a risk you could break the spine when trying to keep the page flat to photocopy the QRS pages. Same with the Order tokens, although there are ways round that.

There are lots of photos of great looking models. Some people have strong views on this sort of thing. I’m not one of them. They are nice to look, and in some cases are used to illustrate the rule mechanisms, and in others are pure eye-candy. I think that sometimes they can get in the way. e.g. the procedure for determining an army’s will (‘General Will’). I was trying to understand what the results table meant - was that a score you have to exceed or equal? I looked and looked, and it wasn’t until I turned the page and saw the explanation. Maybe it's just me. Personally speaking I would prefer having the explanation first then the adjustments to the D6 roll, then the table and then the photo. This way what you need to know is all on one page. I know you should read through the whole book first then, try to understand it properly on subsequent reading. I did do this, but hey, I have a memory like a sieve these days.

The actual answer I was looking for was incorrectly worded (or the table is wrong). “If the adjusted score is equal to or less than the number indicated in the table above then the Army’s resolve is good…". The table is shown below. If a die roll equal or less than 6 on a D6 is required to pass, then that is an automatic pass. If this is what was meant then the ‘Automatic pass’ section in green should be much larger. Or should the wording be “If the adjusted score is equal to or  less than the number indicated in the table above then the Army’s resolve is good…’. 


It's fair to say that I haven't come across major bloopers.

Conclusions

I like the look of them overall, bar the quibbles mentioned above. However, the ultimate test is to see how they play so I will reserve judgement until I’ve had a game, which I will definitely do soon. That is more positive than it sounds since there are many rulesets that I won’t even bother trying because they are too fiddly or don’t begin to address what I am looking for in a game.

Saturday, 25 April 2020

Reinforcements / Mission Creep

I was making good progress with the list of wargaming jobs around Easter time. Here's where I'd got to a week or so ago.
  1. Finish ECW 'clubmen'. Just 'texturing the bases and a bit of touching up of paint. Complete
  2. Texture ECW casualty marker bases. Complete
  3. Finish ECW musketeers. Probably at least a regiment's worth. Maybe have as firelocks? Complete
  4. Finish ECW command figures. A few to paint and texture bases. Complete
  5. Finish ECW odds and sods, e.g. limbers. Limbers and horse teams done.
  6. Paint bridges. Complete
  7. Finish AWI. Quite a few Brits done but no Yanks. Brits need cleaning up too.
  8. WWII Finns and Russians (10mm) - lots of infantry and AFVs. Painted sufficient infantry for a decent game
  9. Touch up and base 6mm siege train, pontoons and transport. 
  10. Paint and base 6mm cattle/bullocks - Baccus, bought with my Naps. Too big for my SYW (H&R and Irregular).
  11. Base Leven hedges so they don't keep falling over. 
  12. Finish 6mm gabions. Complete - for now, i.e. I had enough for Kunersdorf.

I ordered some more bases (30x30mm) from Pendraken that I needed for the WWII infantry and these would also come in handy for my ECW horse. Of course along with the bases I had to get some more cavalry and I needed some pikemen so I had more balance with my musketeers. While I was at it I thought I may as well get those labourers and petardiers I've been thinking about. And I'd have to get some more foot command figures. Those pikemen would go together with the already completed musketeers to make up more units. These units obviously must have command stands. As there are more figures in a command pack than I need, some can go towards the crews for the guns that I have that don't have crew for, and others can adorn generals' bases. Ditto some of the labourers - I can place some of those piles of shot I got a couple of years back into the wheelbarrows. All very useful. The guns I mentioned are actually ships guns from Irregular's 10mm pirates range, acquired for defending towns.

Ah yes, the towns to be defended. I have some buildings. Some fieldworks which do for temporary defences for places that didn't have walls. Walls. That's what I'm missing. Or rather was until the Leven order arrived.

Just a few pieces to start with to try them out for size. 1 Scale Down. Could almost be used unpainted. I'll need to make some thingamajigs to stand the foot bases on, au Foy. I plan to add some earthen bastions. I have a couple of 3mm scale bastions from Magister Militum which I'm adapting with ramparts made from 'green stuff'. Photo taken in my temporary office, aka the dining room, which also doubles up (triples up?) as the war Room.

The WWII chaps have been based and the bases textured and base coated. I just need to 'dress' them with small stones, scatter material (suitably dark for forest undergrowth) and some twigs. I'll be very sparing with my usual 'grass flock'.


And I've made a start on the new ECW foot and horse. Plenty of pikemen in there. Enough for two and a half units. Oh and those horsemen at the back on the left are mounted officers which I use as generals and 'messengers', which I had a desperate shortage of. I nearly forgot to mention them. The ones wielding swords have had their arms bent into different positions so I have a bit of variety.

The horse are Scots. Not necessarily my first foray into the Covenenters and co. They were purchased for a bit of variety in the hat department. However, I couldn't resist painting several of the horses as greys in a nod to the 2nd (Royal North British) Dragoons.

The eagle-eyed observer will have noticed the books in the photo with the walls. I've been meaning to get In Deo Veritas, Helion's new 17th century rules and when I saw they were selling them for £5 less last weekend I dived at the chance. Early impressions are that they look good.


And the second book? That really does have the potential for mission creep. I actually ordered the sister volume (i.e. Part I: the Infantry) because it was cheap* (<£8 with postage from Military & Naval). However, when I opened the package on Friday I saw they'd sent Part II despite Part I being on the delivery note. I've asked them if I can keep Part 2 for the same price and I'd still like to buy Part I. 

* I'm like Mrs Smoker in the Monty Python 'piston engine' sketch.

The main war that I can think of that this book covers is the War of the Austrian Succession. This is not too far from SYW, but hitherto I've been gaming Austrians and Prussians (with the occasional appearance by the Russians). No definite decisions have been made yet. Not by any means If I were do build up a Dutch army then I'd have to do the French as well (who would be used for SYW). And maybe the Rosbifs too. What was it about acquiring an empire in a fit of absence of mind?

All of this whilst I've got vague plans for a venture into Colonial wargaming. But what exactly? The Sikh Wars have long appealed. Or maybe the Indian Insurrection (not sure what we call the Mutiny these days). NW Frontier has an appeal too, but scarlet or khaki era? A couple of weeks back I watched Khartoum, which naturally got me thinking about the Sudan (but 1880s or 90s?).

Post Script
Part I of the Dutch army in the 18th century book is on the way. thanks to those good people at Military and Naval. So more temptation. Get thee behind me Satan. 

Sunday, 19 April 2020

Helion £5 off sale

Just a reminder about this. May be too late now, but just in case....with it being ‘Salute weekend’ there’s a fiver off all titles. I just ordered In Deo Veritas (I nearly wrote ‘vino’ instead of ‘deo’) for 15 quid rather than 20.

Monday, 13 April 2020

Tadcaster 1642

The game went ahead this afternoon via FaceTime, starting at 4PM and finishing by 6PM. We got through half of the maximum 20 turns when the Parliamentarians pulled off a repeat of their tactical victory by acheiving 11 Victory Points.

I set-up the table (terrain, town, roads, and redoubt) and placed two bases of musketeers in the redoubt, then sent the briefing and maps below to my son.

Tadcaster Scenario Briefing - Parliamentarians - 7 December 1642

Commander: Lord Ferdinando Fairfax (Middling)
Deputy: Sir Thomas Fairfax (Lively)

The war has been going on since late Summer. The forces fighting for King and Parliament to prevent the King, led by his maleficent counsellors, overthrowing the ancient freedoms of his people have successfully resisted the would-be tyrant’s legions and thrown them back from London. In Yorkshire, those loyal to King and Parliament have prevented the King from seizing the port and arsenal of Kingston-upon-Hull.

You have 21 companies of Foot, 7 troops of Horse, 1 company of Dragoons and 2 guns (total c 1500 men). You are in occupation of Tadcaster and control much of the West Riding of Yorkshire for the Parliament. Second in command is your son, Sir Thomas Fairfax. William Cavendish, Earl of Newcastle, has led a large army from Durham into Yorkshire on behalf of the King (badly counselled by his popish advisors of course). Newcastle has occupied York and is rumoured to be on his way to Tadcaster with 4 times your number.

On the evening of the 6th, you invited your senior officers to a council of war, at which all relevant matters were considered. The council decided to retreat the next day to Leeds in order to draw upon your strength in the West Riding. You have a redoubt containing a strong body of musketeers on the east of the River Wharfe, on a height commanding the approach to town from the direction of York. Under your orders the bridge across the river has been damaged and a few planks provide a narrow crossing point to restrict a sudden descent by the Royalists.

On the morning of the 7th, the majority of your forces in the town on the west bank of the Wharfe have been readied to march to Leeds. Some time after 10 of the clock you receive an urgent message from the redoubt of the advance of the Royalist down the York road. This is much sooner than you expected. If you march westwards now, your musketeers in the redoubt will fall into the hands of Newcastle and his Horse may fall swiftly on your army’s rear and catch you on the march. You have no option but to repulse Newcastle and rescue your force on the east bank. You will abandon the town, but save your forces.

Objective 

Retreat down the Leeds Road with your whole force including the guns from the bridge and the musketeers from the east bank of the Wharfe.

Victory Conditions 

Each base lost will be 1 victory point (VP) to the opposition.
Additionally each of the musketeer bases in the redoubt lost will mean an extra VP for the opposition.
Each commander lost will be 2VP to the opposition.
The side that reaches 11 VPs first is the winner.
Darkness will fall after 20 turns. If the Royalists haven’t won by then the Parliamentarians will win by default.


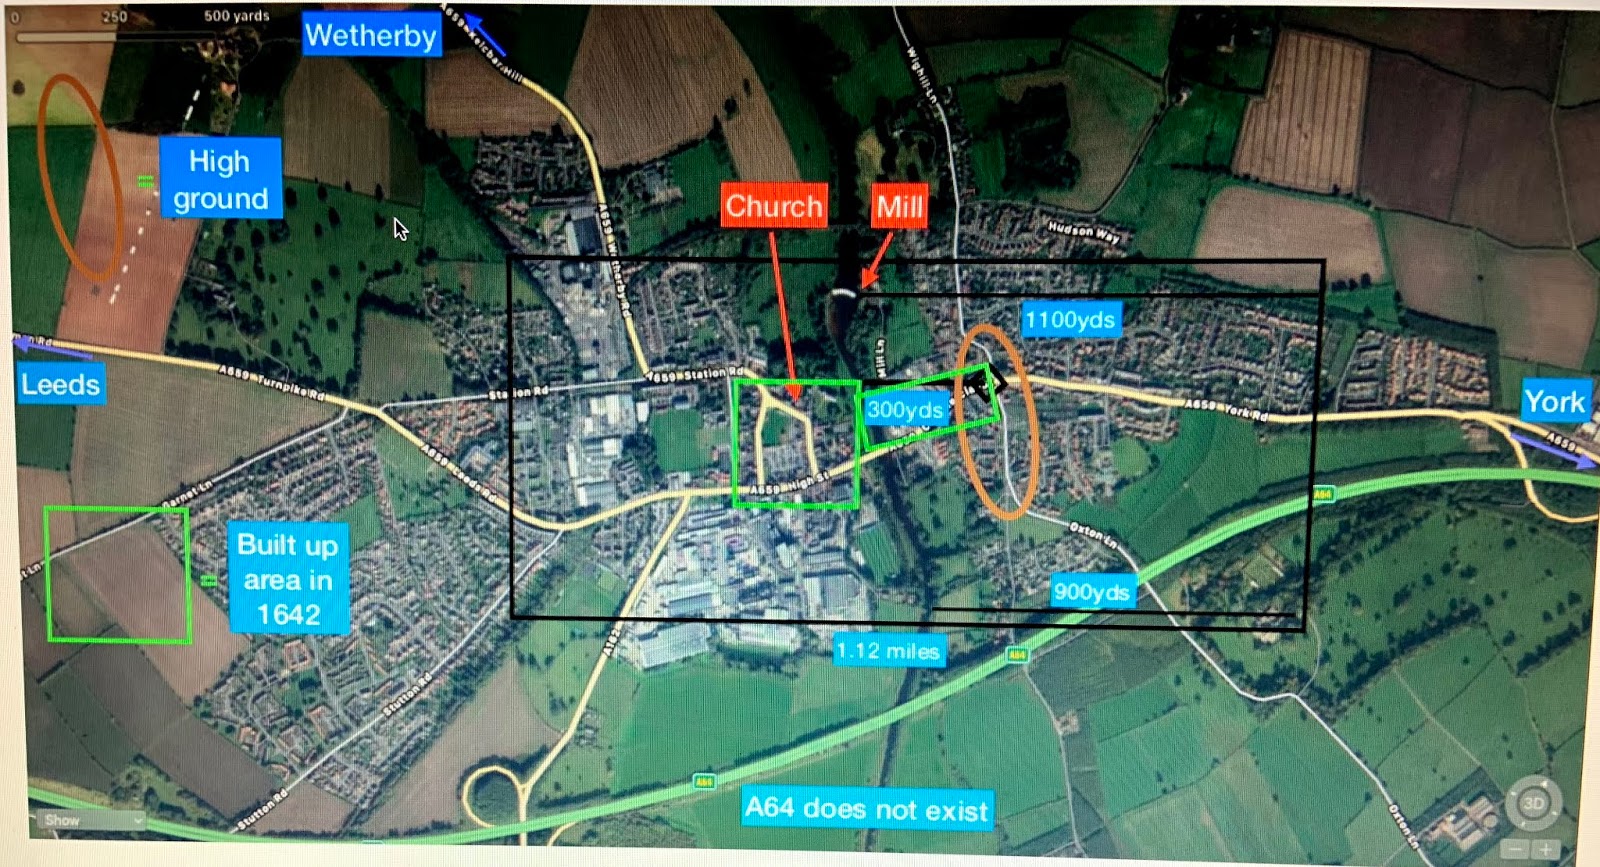
Area map provided - had to photo my screen because I can't load pdf or Keynote files. I provided this as a clue to what might happen. If the Parliamentarian player noted the disparity in numbers then saw what was on the board, he might think "where are the rest?"

The table layout. Black rectangle marks the table (3 feet by 6 foot 6). Redoubt is on the ridge (brown oval) at the junction of the York Road and the white road. Two musketeer bases are in the redoubt. One gun model is at the western end of the bridge. Fairfax could place the rest of his forces anywhere on the western side of the river.
I did my usual scan of sources available to me and tabulated the results. I've put the number of bases I decided on under the Cooke numbers.


Parliamentarians
Royalists

Link
Sources
Foot
Horse
Dragoons
Guns
Foot
Horse
Dragoons
Guns
Wikipedia
See 1 below.
900-1500 men in the town. Context implies more in the redoubt.

Newcastle: 4500 horse and foot
Newport: 1500 horse and dragoons
Newport: 2 guns
The Civil War in Yorkshire, David Cooke

Doesn’t list all sources. Not cross-referenced.
21 companies (5 musket, 2 pike bases)
7 troops (7 bases)
1 company (1 base)
1 at the bridge (1 base)
4000 foot and several hundred horse. (5 battalia plus 10 bases)
Newport: 1500 horse and dragoons (30 bases)
Newport: 2 light guns (1 base)
BCW Project
See 2 below.
Lord Fairfax: 900 men
Sir Thomas Fairfax: 300 foot and 40 horse
6000 at start of Dec
2000 at start of Dec

1
2
  • A.H. Burne & P. Young, The Great Civil War, a military history (London 1958)
  • S.R. Gardiner, History of the Great Civil War vol. i (London 1888)
  • P.R. Newman, Atlas of the English Civil War (London 1985)
  • C.V. Wedgwood, The King's War (London 1958)

The game is told below through the captions.

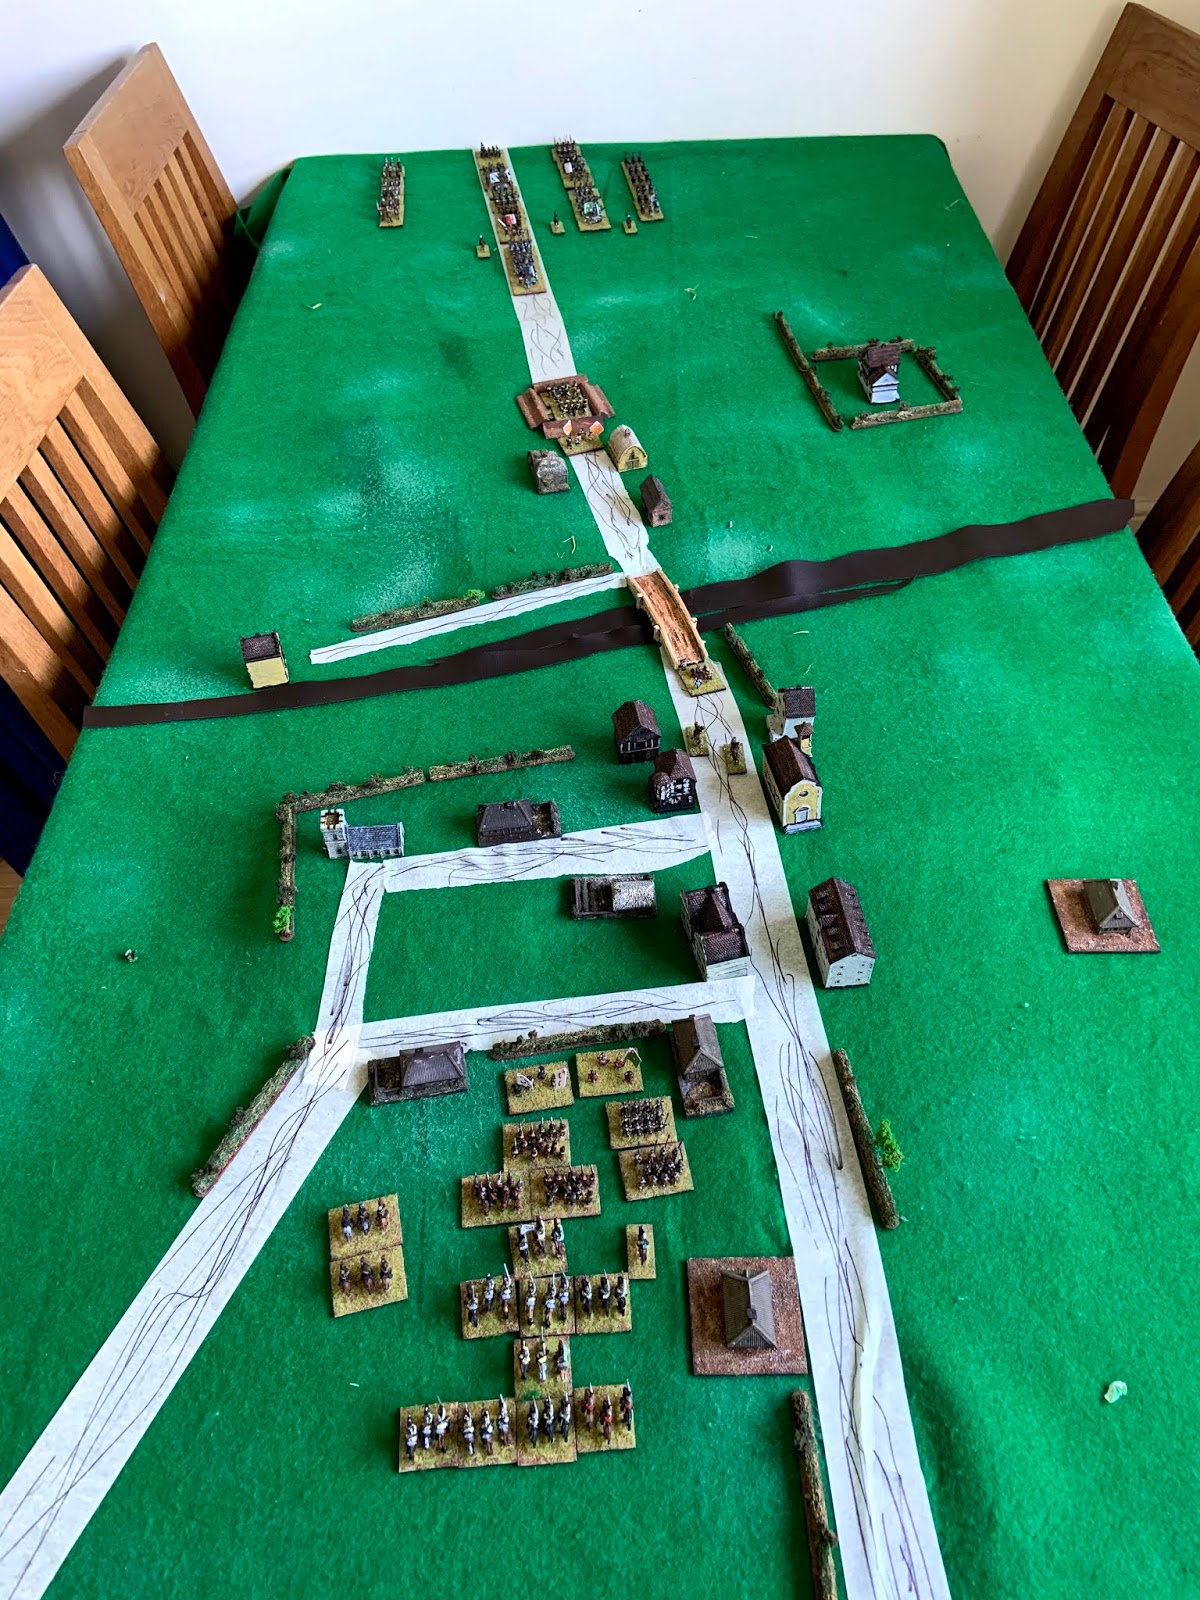
Looking across Tadcaster towards the advancing Royalists coming from York. The available Parliamentary forces (minus the shot in the redoubt and the gun at the bridge) are in the foreground. Leeds road comes down from the town to the bottom right. Wetherby Road heads to the bottom left. My son elected to place all his forces in column on the road heading to the bridge.

First over are a regiment of horse who deploy under the direct command of Sir William Fairfax along the hedgerow by the river. A Royalist horse unit has bounded over the ridge and does not deploy in time.....Meanwhile foot in the redoubt open fire on the advancing Royalist foot - a dice roll determined that they opened fire at long range rather than saving their best fire. Nevertheless they whittle down their foes.

Fairfax gets the horse under his command to wheel into the Royalists in column who are struck halted and shocked. They inflict 10 hits (3 bases plus 1 marker). The cavaliers rout off the field crying "murther, murther" as they haven't heard of the letter 'd'. Unfortunately Fairfax's men's blood is up and the Yorkshireman loses control and follow them off the field! This means against the 6VPs gained, they lose 7 to the Royalists!
Back around the eastern suburb the Royalists swarm around the redoubt and buildings. They lose one unit to effective musketry and another gets battered. To stand a chance against earthworks, shot needs to be at close range (60 yards). The Royalist horse south of the road looks to have caught a small Roundhead horse unit at the halt. They charge once, and then again - each time failing to charge home. This counterbalances the poor Roundhead luck in the loss of Sir Thomas and his harquebusiers. Roundhead dragoons have dismounted and pour shot into the flank of the cavaliers leading to the gaining of the 11th and winning Victory Point.

Side view of the same action.

So a satisfying game. I obviously couldn't see things from his point of view, but my son said it was difficult at times to picture what was where (I was holding my phone by hand) but maybe that added a bit to the fog of war. The rules continue to provide a simple, playable game. Shooting and melee are bloody, but this keeps things moving along quickly. I'm conscious of having no limit on muskets popping away all day so maybe a simple mechanic is needed there.

My son ended the game having thrown all his available forces over the bridge, thinking that there were extra Royalists coming directly from York and he needed to beat the first wave before they arrived. If the game had gone on 5 more turns I'd have started dicing for the arrival of Newport's column via Wetherby, but he'd repulsed the main force under Newcastle well before then.

He's keen to try another game and next time wants to use his Napoleonic Prussians.