Today was finally C-Day. The extra extension was fitted to the dining
table making it 8 feet long by 3 feet wide. Or 2400 yards by 900 in
scale. I used my own rules again and this time found less need to tweak
them, which is a good sign. But then I know what I was intending things
to mean and playing solo does give you more opportunities to 'interpret'
without a 'debate' with an opponent. The game took two and half hours,
which is not bad, helped by the introduction of a simple break point
mechanism. I worked on the basis of 25% of bases eliminated as being the
break point. So the respective totals were:
Royalists:
Horse - 36 bases
Foot - 18 bases (in 6 battalia)
Artillery - 3 bases
Break Point - 14 bases
Parliamentarians:
Horse - 54 bases
Foot - 21 bases (in 7 battalia)
Artillery - 4 bases
Dragoons - 4 bases
Break point - 21
I'd
originally worked out orders of battle that had the same numbers of foot and guns as
above but the Horse totals should have been higher. However, I
had overestimated how many horse bases I had so each side had to be cut
back. So I 'need' more cavalry. And staff figures - I barely had enough
for two commanders and brigade commanders let alone the messenger
figures needed. I need to have a serious conversation with the provost and the quartermaster general.
As mentioned in a
previous post, I opted
for the Adair hypothesis for the position of the battlefield rather
than the traditional view. So my action was bounded in the north by the
'South Spur' of the 'Arena', in the south by the ridge that Hinton
Ampner lies on, and the west by the valley of the River Itchen's
headwaters. I didn't depict the stream on the table as it's effect would
be negligible at that point. I started the game at the point where the London Brigade had already been ejected from Cheriton Wood. For this scenario, I chose to depict two lanes boardered by hedgerows, heading from the South Spur. I intended these to take the part of those enclosures which reportedly restricted Royalist cavalry deployment. The two lanes were 'Alresford Lane', and 'Broad Lane'. On the table the lanes open out as the reach the field at the foot of the ridge. Until that point the cavalry advancing down them have to remain in route column - after that they could test to deploy (following normal house rules for change of formation/direction etc).
The narrative of the game is told below
through the pictures with captions. The game started with some amazing shooting by Hopton's guns. Over the course of the game they took out 3/4 of their opposite numbers. The photos, unfortunately, do not show this bright spot for the King's men.
 |
| Royalists to the left (on the 'Southern Spur'). 'The little village' (not believed to be Cheriton) to the foreground on the left. Cheriton Wood would be off table, top left. Alresford Lane in the background and Broad Lane near the middle. |
 |
| Royalist foot occupy the 'little village' They were to retain posession throughout and their long range shooting successfully held of the Rebel dragoons. |
 |
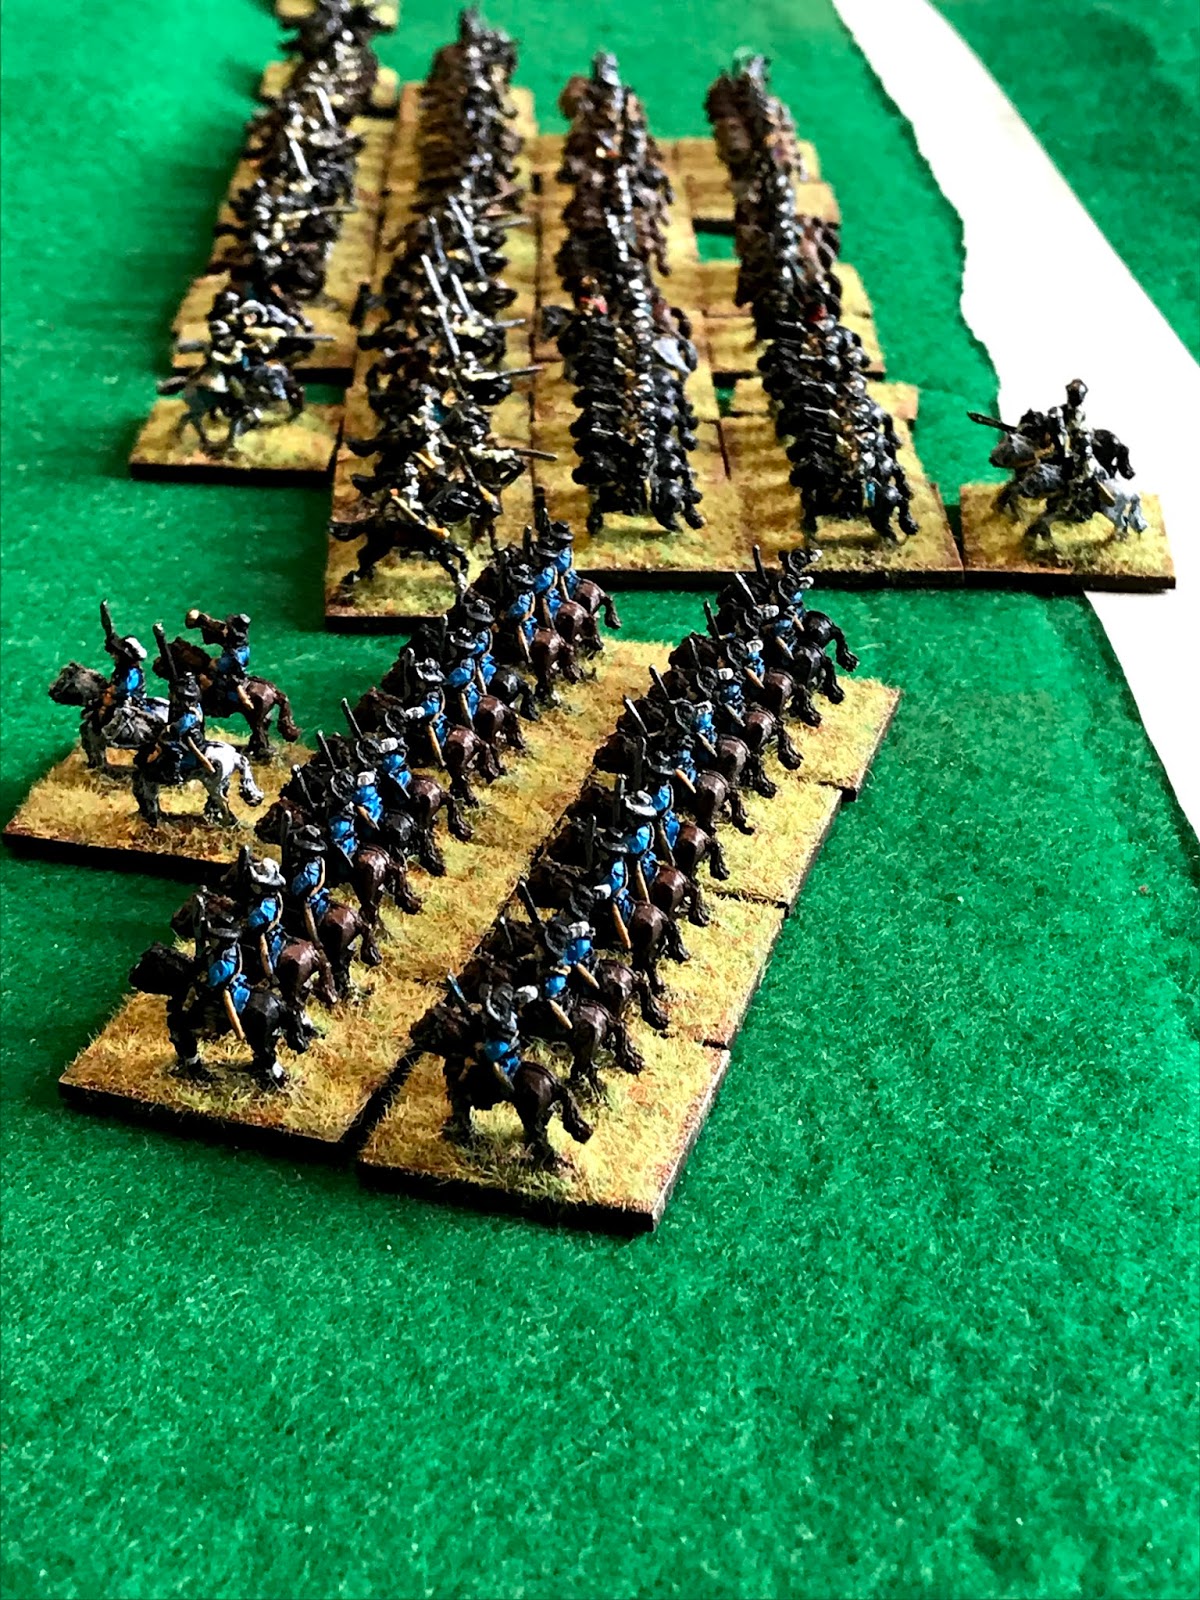
| Royalist horse descend the ridge via Broad Lane, cheered on by their brigade commander. |
 |
| Royalist left wing infantry, fresh from their success in Cheriton Wood, eager to 'tickle' more rebels with their pikes. The pikemen are conversions from Pendraken musketeers firing. The blue coated musketeers on the right are mostly Pendraken peasants with some farm implements who I've painted up as musketeers with weapons reversed to use as clubs. |
 |
| Aerial view of the eastern end of the battlefield. Royalists to the north (top). The Petersfield road cuts through the valley in the middle. Alresford Lane comes in from the top. |
 |
| Western end of the battlefield. Broad Lane heading down from the top towards the Petersfield Road |
 |
| Early clash just north of the road on the Parliamentary left. Rebels to the right. After a couple of rounds there was no decisive breakthrough. Both sides separated and gradually, unit by unit throughout the game they came back into contact for a grinding match that the Rebels got the better of. |
 |
| After pounding down Broad Lane a regiment of Royalist horse failed to deploy and went crashing in route column into a unit of Parliamentary foot on the ridge opposite. The Parliamentarians were pushed back with losses but the Royalists couldn't inflict a decisive blow from their narrow frontage. |
 |
| Another shot of the uphill charge in column. |
 |
| On the left wing, the Royalist horse also failed to deploy and were met head on by a Parliamentarians regiment coming down off the 'Hinton Ampner ridge'. |
 |
| Cavalry actions were occurring all over the field. Here in the centre a large Parliamentarian regiment exchanges blows with a smaller Royalist unit. |
 |
| The Royalist cavalry that attacked still in column is in turn hit in the flank by a powerful Parliamentarian regiment. Because only two bases contacted, the effect was not as bad as it could have been. |
 |
| In the plain near the village a Roundhead regiment attempts to charge home against a Royalist foot unit. They were met bravely, and with a whiff of blackpowder and lead, they were sent packing. The horse unit was then in danger of a severe mauling if it stayed nearby so it promptly countermarched to the rear (having successfully passed the test to change direction). This could be a dgerous move in itself as if they didn't pass another test they would continue marching off the field - under my rules units 'march to the last orders' until those orders are changed....by passing a test. |
 |
| Near Alresford Lane the Parliamentarians are gradually pushing the Royalist horse back up the slope. |
 |
| After an inconclusive first round, a second Rebel regiment joins the fray at the junction of Alresford Lane and Petersfield Road. |
 |
| Back in the Parliamentarian left centre, the two sides' horse stand-off and recover their breath after a fairly inconclusive first round. |
 |
| Rout! Hit in front and flank, the first Royalist unit breaks leaving their chums (in blue by the hedge) behind. They are pursued down the slope by the Roundheads. |
 |
| General view of the western end. The unit of blue horse in the near ground are the Roundhead unit seen off by the Royalist foot (blue on the left). |
 |
| Anothe Royalist unit breaks. This time the horse who charged up the ridge in column on Broad Lane. |
 |
| Yet another regiment of Royalist horse has broken (the chaps heading towards the hedge). It's all over for the Royalists having reached their 'break point'. |
 |
| Bases lost by the two sides. Parliamentarians at the top of the picture. Note the 3 guns. By contrast all the Royalist losses are horse. If the game had lasted another turn the Parliamentarians could have lost up to 5 more bases (3 casualty markers = 1 lost base), but it still wouldn't have been enough to swing the result. The container used here is one of my olde Fererro Rocher boxes lined with magnetc paper. Thanks to Mrs Nundanket's friend, I now have 4 empty boxes ready for re-inforcements! |
 |
| End state. The foot on both sides are largely untouched, but the majority of the Royalist horse has been soundly defeated. Time for the pretend Hopton and Forth to beat the retreat. |
 |
| It never came to this. |


Great bat rep, but I demand that you play it again and again until the Royalist's win. Lol. Liked the pikeman conversions - great idea. Worried for your health if you had to eat all those Forerro Rocher to get the boxes.
ReplyDeleteAh! I'm prepared to take the risk for my hobby. Anyway I've always got wiling volunteers to help me dispose of the contents. I've got more boxes than I need now for my ECW armies so I plan to ultimately switch my SYW and Naps over from the old Ikea boxes that have been OOP for years. Scenery can then be transferred to the old troop boxes. The science is explained here: https://horseandmusketgaming.blogspot.com/2019/05/boxing-and-basing-or-ambassador-you-are.html
DeleteP.S. I'm sure I will return to Cheriton at some point. Even I am prepared to let the spawn of Satan win if God wills it.
DeleteI have a hankering for Cropredy Bridge first though. If I can work out how I can fit it in space wise.
Good looking battle,I like the little village and the cavalry look particularly striking,I quite fancy Cropredy bridge at some point.
ReplyDeleteBest Iain
The Pendraken models are excellent. I prefer their LOA cavalry to the ECW models. The LOA ones have much more dynamic poses. Unfortunately they're significantly larger so you can't mix them in the same units.
Delete