Monday, 2 March 2020

Weaver Winner

After my last two sojurns into the 18th century at Soor and Kunserdorf I felt the urge to take down my pike and don my morion. 'But what battle?' I asked myself. Then up pops everyone's favourite count with a reprise of Nantwich. That struck me as an interesting encounter - encounter being the right word, as M.Foy points out it was more of an encounter battle than stand up fight. It entails a Parliamentary army marching to relieve Nantwich which had placed undersiege over the winter of 1643-44. Lord Byron gathered his besieging army and sought to attack Sir Thomas Fairfax's army of relief before it reached Nantwich.

I knew nothing of this except what I'd read some time ago in Charlie Wesencraft's 'With Pike and Musket', so I set to reading up what was on the internet rather than ordering books and waiting until they came. I subsequently ordered Barratt's booklet from Caliver along with another booklet on the Siege of Lyme.

I collated the numbers in the table at the bottom from various on line sources, then  re-read both accounts of the wargame of the battle of Nantwich on Prometheus in Aspic. I went with 6 Roundhead battalia and five Royalist battalia of foot, assuming each was around 500 strong - this seems to fit the consensus on the numbers of men. For cavalry I decided on 6 and 4 respectively, in favour of the Roundheads. In addition each side had 2 bases of sakers, the Royalists had a musketeer unit, the Parlies a regiment of dragoons and 800 raw garrison troops in the Nantwich suburb of Welsh Row. To balance things a little I used M.Foy's troop ratings which made all but one of the Royalist foot, and one of the Royalist horse units veteran.

I measured out the distances between various landmarks on a modern map of the area of the battlefield, and added a rectangle to the dimensions of my table. After shifting the rectangle a few times I landed on what I thought was the optimal position. The tricky part of this is my table is not very deep so I have to be selective about what to include on the table top.

The action was played out this afternoon and evening over about 2 1/2 hours in total, and is told through the captions below.
Black Tom cheers his lads on whilst Sir William Brereton prematurely enumerates poultry, confident that they will soon link up with the Nantwich garrison.
The opposing armies in the distance. Roundheads marching towards Nantwich in the foreground. The Royalists aiming to catch the rebels en route. Abandoned Royalist siege lines can be seen left of Nantwich.


The Royalist host, foot in checkerboard formation, advance to attack the Parliamentarians, hoping to catch them still in march column.

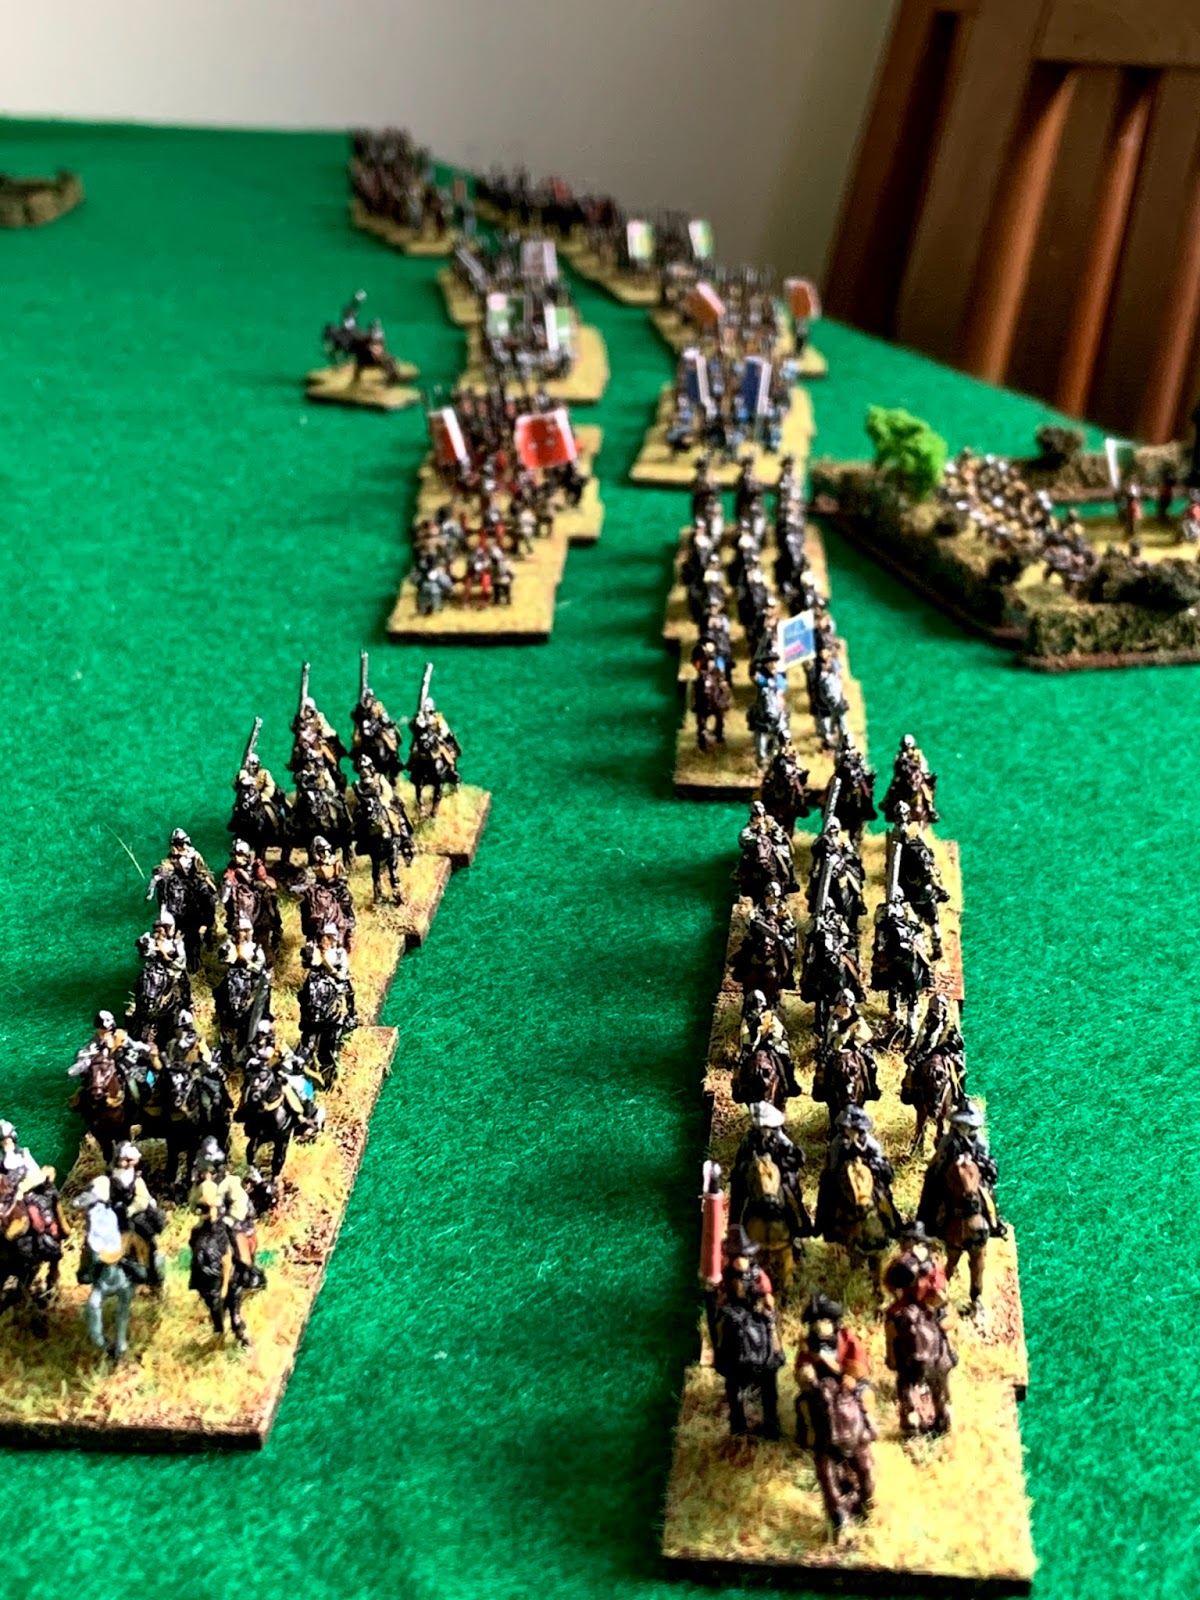
Black Tom's army on the march to Nantwich. The Roundheads would have to test to change direction to face the Royalists, unit by unit. This made it extremely difficult to co-ordinate a response, with some units continuing their march whilst others turned off the road.


Royalist view of the marching Roundhead column.


First clash of horse on the Royalist right. This fight was to swing to and fro over several turns. Unfortunately for the Royalists they lose Lord Molyneux in the melee (and a victory point to the rebels).

Three Roundhead foot battalia and the artillery have deployed by Henhull farm, but one continues its march and obstructs the guns, just when tempting tagets appear. It's looking dicey for the Parliamentarians with some units deployed and others marching on towards Nantwich.


Royalist guns open fire on the Roundhead column. Their aim is accurate, and the powder burns well. They cause losses on the rebel column and force them to hold their advance. In the background the Royalist horse swing around the enclosure to take the Roundhead flank.


View from Henhull farm of the approaching Royalist tertio. One of the rebels' battalia hasn't got the memo and marches across the front of the deployed sakers.


Roundhead harquebusiers make a beeline for the flank of the Royalist foot (currently pre-occupied with the Rebel foot). Fortunately for the Royalists, the enemy horse fail to charge home and flow round them. The horse go on to charge the Royalist guns, successfully spiking one pair gaining a victory point in the process.

The bloody firefight in the centre.


Fairfax's foot (background) begins to gain the upper hand, once the Royalist horse on the Roundhead left is fully occupied. Two Royalist battalia are knocked hors de combat (two more victory points for the Roundheads).

Over on the Royalist left the horse and foot of both sides finally shape up against each other. On this flank the Royalists eventually gain the upper hand decimating the opposing foot and routing both horse units (this brings it back to 2 VPs to 4).


Roundhead horse chase off the gunners and spike a pair of guns.


From behind the Roundhead foot you can see the massive gaps appearing in the Royalist line.


After 6 turns the Nantwich garrison can dice to join the fray. It takes a couple more turns before they do, arriving too late to make a difference.

Overview of the collapsing Royalist position in the centre. Their right wing cavalry have been cleared from the field. On top the left the Cavaliers have seen off their opponents and the left wing foot has gained the upper hand, but is it going to be too late? Bottom left, the Funky Hulk's men have left the confines of Acton to save the remaining pair of guns (and a VP)

But it's all over. The second cavalry regiment on the royalist right is cleared from the field, giving the Roundheads their 6th VP.  The game is won 6 VP to 4 - two foot and horse units apiece plus the loss of the Royalist guns and Molyneux.

Royalist losses: 13 horse and 10 foot bases.

Parliamentarian losses, not much lower at a total of 22 bases.

So, with apologies to JBM, another battle chez Nundanket goes the way of the righteous (and with history). I have a few more tweaks to make to my rules, or rather the written version as I made changes in game. They keep evolving each time I play, but still recognisably the same.


Parliamentarians
Royalists

Link
Sources
Foot
Horse
Dragoons
Guns
Foot
Horse
Dragoons
Guns
Wikipedia
Young & Holmes, Rogers, BCW Project
4500 (Might incl garrison)
1800
500

2000
1800


Battlefields of Britain
*
3000 (+2000 in garrison)
1500
500

2500
1000


Battlefields Trust
None cited
2500-3000
1800
500

2500
1000


BCW Project
**
3000 (+2000 in garrison)
1800


3500


  •  Adamson, J (2007). The Noble Revolt. Orion, London.
Barrett, C.R.B (1896). Battles and Battlefields in England. London.
Bennett, M (1990). A Travellers Guide to Battlefields of the English Civil War. Webb and Bower Ltd, Exeter.
Beresford, M.W and St Joseph, J.K.S (1979). Medieval England - An Aerial Study. Cambridge University Press, Cambridge.
Burne, A.H (2005). Battlefields of England. Pen and Sword Books Ltd, Barnsley.
Cyprien, M and Fairbairn, N (1983). A Traveller's Guide to the Battlefields of Britain. Evans Brothers Ltd, London.
Dodds, G.L (1996). Battles in Britain 1066-1746. Arms & Armour, London.
Douglas, D.C, Coward, B and Gaunt, P (ed) (1975). English Historical Documents Vol 5B (1603-1660). Routledge, London.
Gardiner, S.R (1889). History of the Great Civil War Vol. II. London.
Green, H (1973). Guide to the Battlefields of Britain and Ireland. Constable, London.
Guest, K (1996). British battles: the front lines of history in colour. Harper Collins, London.
Hunt, T (2003). The English Civil War at First Hand. Orion Books, London.
Kinross, J (1979). The Battlefields of Britain. London.
Lancaster, J.H.D (2015). Nantwich: Battlefield visit notes and observations. CastlesFortsBattles.co.uk.
Ordnance Survey (2015). Nantwich. 1:1250. Southampton.
Roberts, K (2005). Cromwell's War Machine: The New Model Army 1645-60. Pen and Sword, Barnsley
Royle, T (2004). Civil War: The Wars of Three Kingdoms 1638-1660. Abacus, London
Smurthwaite, D (1993). The Complete Guide to the Battlefields of Britain. Michael Joseph, London.
Woolrych, A (2002). Britain in Revolution. Oxford University Press, Oxford.

** A.H. Burne & P. Young, The Great Civil War, a military history (London 1959)
S.R. Gardiner, History of the Great Civil War vol. i (London 1888)
Peter Gaunt, The Cromwellian Gazetteer (Stroud 1987)
Ronald Hutton, The Royalist War Effort 1642-46, (London 1999)
P.R. Newman Atlas of the English Civil War, (London 1985)
Stuart Reid, All the King's Armies (Staplehurst 1998)
Alf Thompson, Nantwich 1644 (Orders of the day, Volume 31, Issue 1, Jan/Feb 1999)

Sunday, 23 February 2020

The Man Who Would be King / Liverpool / Treasure Hunt

Driving back from a trip to Liverpool* I switched on the radio for the last hour of the journey. After a minute of channel hopping I found this on BBC Radio 4 just after it started:

The Man Who Would be King

57 minutes well spent. Worth this week's contribution to the licence fee on its own (about £3 a week). The programme ended just as I parked up at home. Nice timing.

* This was the first time I'd spent some proper time in the city. I've been up a number of times - a work trip (ie. stuck in a meeting for hours); a university open day and dropping off/collecting my son there. But it's always been in and out. I've heard several times what a great place it is** and my son loves it (more than the university) and he's been on at me to visit properly. He's coming into his final few months at uni, so as it was the girls' half term I booked a couple of nights through AirBnB and we headed up Thursday.

** Well they didn't lie. It's a fabulous place. Lots to see and do as a tourist. Some great architecture and fascinating history. I only got a chance to scratch the surface. Highlight for me was the Metropolitan Cathedral of Christ the King a.k.a. Paddy's Wigwam. I found it an inspiring and moving ediface. Actually I lied above. I had spent a bit of time in Liverpool on 'non-mission centred' activity and experience. On the university open day in 2015**, son and I had a wander around Paddy's Wigwam. What I hadn't noticed before was that all the chapels around the perimeter are a different shape. Obvious once its pointed out. There are still vast areas of the city that don't look like they've seen the benefits yet of the rebirth of the city. Hopefully it won't be too long.

*** Which reminds me of an incident later that day. Son, who I had infected with the virus that is Grimsby Town, had clocked that Town were playing at Southport the same day as the uni open-day. So as we were up there anyway we drove up to Merseyside's premier resort (via the Anthony Gormley statues at Crosby). At half-time there was a commotion amongst a bunch of lads at the other end of the terrace. A couple of days later I came across this. Dangerous and daft. But the sheer innocent joy of it! Sadly the boy in the bin died a couple of years later (from something completely unrelated).

Ah yes, the treasure hunt. The check in details for the flat we rented the first night ran to several pages. First we had to go to a 'nearby' hotel where the owner had rented car parking space (with some cloak and dagger instructions too). Nearby = 3/4 mile. Then go to postcode L1 XXX, identify a bike padlocked to a stand outside a branch of a pub/eatery chain, open the bag on the bike, use code nnnn to open locker S2 to retrieve key to appartment. Then proceed to appartment at L1 YYY (again with more cloak and dagger instructions - not at all suspicious, honest guv). Not once did the host see fit to give the actual street address for the appartment. And despite requests to do so (I'm a little old fashioned, not trusting entirely to tech. Or strangers), the host did not see fit to provide them, merely to re-iterate the instructions. Don't think they'll be getting a five star review.

The view from the flat was worth it though. Apologies for the glare - this was just as the sun was going down. I give you the Three Graces:
Liverpool Pier Head

The Cunard Building (left) and the Royal Liver Building.

Here's a professional shot of the same view:

https://www.visitliverpool.com/things-to-do/pier-head-and-the-three-graces-p17747


Tuesday, 18 February 2020

Kunersdorf Wargame Part II

I managed to get several more turns in today, but then called it a day. There was no end in sight. Both sides still had lots of reserves of strength. Here are a few more photos with captions bringing things up to date.

The Russians have started the fight back to re-gain the Mühlberg with some success. The Prussians send in more troops from the left of the picture to hold the position. Meanwhile on the bottom left the Prussians have assembled a powerful mass of horse, foot and guns to batter through the waiting Austrian infantry - more Russian infantry and artillery are ready behind them though.

Close up of the Prussian lines referred to above.

And the Kaiserlicks awaiting their fate.

Prussian bases lost at the close of play: 3 infantry, 2 artillery, 1 cavalry and General Finck

Austro-Russian bases lost: 9 foot, 6 cavalry, 2 artillery and 1 un-named general.
Whilst the losses look heavily in the Prussians' favour there are several more Prussian bases with losses and it wouldn't take much to finish those ones off, so the balance of casualties is more even than the pictures look.

Neither side looked in any danger of collapse and neither had the opportunity to bring overwhelming superiority in one sector. I'd taken a rather unhistorical approach with the Prussians. Instead of rushing in to attack the Allies' right wing, I refused the Prussian left. I did this knowing what Frederick didn't. That instead of marching to the rear of the Austro-Russian position, Frederick had marched around the rear to attack the Allies' front  which was protected by earthworks. If I learned anything from this, it is how difficult a job the Prussians had on their hands. Whilst the Prussians weren't completely overthrown as they were in the real battle, any victory, if possible, would have been a Pyrrhic one.

So what would have been the result if I'd carried on? Difficult to say. There was no end in sight. I had played 20-odd turns. Using the start time of the historical battle, around 11:30 when the preliminary bombardment commenced, that would hhave taken the battle into the late evning probably. Even in the Summer light would have faded. Fighting on would have been very difficult. I think the position would have been similar to Zorndorf a year before, albeit with much smaller percentages of the armies lost as casualties. Unlike Zorndorf the rival armies would have been more capable of fighting on the next day.

I've got some notes on the rules to review and possibly make some changes. Some are things that bothered me previously, but nothing fundamental.

Kunersdorf Wargame Part I

I have managed to get about 5 hours gaming time in spread throughout Saturday and today. The number of turns completed is c 20 using my house SYW rules. The turns churn around quite quickly because (a) that's the way the rules are designed; (b) Kunersdorf presents a narrow front where most of the action is concentrted and there are a limited number of units that can do anything at any one time.  This tendency was reinforced by the Prussians' refusing to pass the village of Kunersdorf and expose themselves to the Russian guns of the main position, and by the Russians' determination to hold their advantageous defensive position and not risk an equal combat with the Prussian cavalry.

The table set-up is shown in an earlier post here and orders of battle are here. House rules are explained in a number of posts last year, starting here if you are so interested.

After an intense bombarment the Prussian infantry storm the Mühlberg defences and gain a toe hold in the NE corner. The Russian batteries were silenced then driven away. You can see here that I have had to use Bavarians and Austrians to stand in for the Observation Corps musketeers.

Around to the west of the Mühlberg the Prussian right wing cavalry engages with their Russian opposite numbers. Here the Russian horse grenadiers do sterling work

More Prussian infantry pour into the defences and expand their foothold on the Mühlberg. Slowly but surely they grind down the Observation Corps. In a couple of cases with nowhere to retreat to, units of the Russians lay down their arms and are massacred where they stood as in the real battle (i.e. if you can't retreat from a push back you take further hits).

A wider view of the position. The cavalry actions continue on the left whilst the Austrian infantry corps can be seen marching up from the allies' right wing, above the stream to the right (block of six bases preceded by two bases of cavalry)


Almost the end of the Observation Corps. Just two bases (regiments) remain on the Mühlberg. Two badly knocked about regiments have been forced off completely. The rest have ceased to exist as formed units. By this point the Prussians had still not lost any bases to about 8 Russians.

The Russians form a new flank beyond the Kuh Grund (just in front of the grenadiers here) and the second line begins to move up in the distance.

Having stormed across the Kuh Grund (the gap in the middle) the Prussian grenadiers enjoy mixed fortunes against their opposite numbers. One base ground down their Russian opponents, the other fought an inconclusive combat for several turns. Eventually the second Prussian base prevails but the first one is caught in the flank by a unit of Russian cavalry which sweeps them away. In the chaos Finck was struck down by a burly Russian curiassier.  One Prussian base remains on the Russian side of the Kuh Grund whilst Prussian musketeers (left) pluck up their courage to renew the assault.

On the western side of the Mühlberg the Prussian cavalry have ground down the Russians to just one untouched unit and two severly weakened ones (note the two units with two casualty markers - 3 wipes out the unit). The Austrian infantry have closed off this flank howeverand the Russian horse had driven away the Prussian artillery in the area.

I'll decide whether to continue tomorrow. If I don't continue I'll have to assess the likely outcome. The Prussians have still only lost a few bases, but a breakthrough looks a tall order.

Monday, 17 February 2020

It didn’t happen today

‘It’ being Kunersdorf. To not many peoples surprise. This is part of the reason: 
Following M. le comte de Foy’s house style, I have opted for terrain ‘one scale down’. Human figure in 1:1 scale . Tree is 1:1.5 scale.


Rouva Nundanket ordered a mature olive tree in the week. I agreed would be ideal for our south facing garden. Recent summers have been very hot and dry and the expectation is that they will continue to get hotter. What could be better for Mediterranean conditions than a Mediterranean tree that is used to parched conditions.

The corollary of hotter drier summers, is warmer wetter winters. So when this tree arrived on Thursday  (let’s call the old girl Olive for convenience), when Olive arrived the ground was sodden and the rain was about to start again. This was the midweek ‘dry spell’ between two storms we’ve been ‘enjoying’ in the UK and northwest Europe. 

The pot that Olive arrived in was a metre wide - her  tree trunk is over half a metre in diameter in parts (sorry Olive your bum DOES look big in that). It took an hour of hacking the (plastic) pot, emptying soil, squeezing and pushing, and lifting* to get Olive through our 83cm wide side gate on her trolley. * inevitably one of the rear wheels went into the drain just inside the gate. We (Mrs N and I) looked at each other several times as if to say why did we do this. But we pushed on through and a couple of  minutes after getting through the gate, Olive’s trolley had reached the end of the concrete paving. Any further and we’d have had an object lesson in why ECW guns rarely moved once in position and the horses had been led away. The ground was too wet (though it did occur to me later we could have used the left over planking from our building work. Never mind the spot where she came to rest would be ideal and Olive would give us some shade on the patio. Mrs N dug the pit whilst I returned to my own labours indoors. Attempts to lift and lever Olive into position were abandoned before we caused ourselves too much damage to our musculature. 

We returned to the task with fresh vigour late this morning  after I’d dropped off the ever-so-slightly younger Ms Nundanket off to her third ballet session of the weekend. My bright idea to lift Olive worked. The only question is whether Olive will get root-rot with the ground as wet as it is.  Phew! We did it though. We saw the job through. We’d constructed the VKT Line. The conditions to be fair were more like Ypres in 1917 than Karelia 20 odd years later. But still a case of ‘sisu’. We’re available for any 1:1 scale earthworks you have in mind.

That still left most of the afternoon after I’d picked up the ever so slightly youngest up, but hay fever (not the onset of a cold as I thought yesterday) made me very sleepy. Hay fever! At this time of year and in this weather! I blame interfering Brussels bureaucrats.

Oh my excuse for the evening? ‘Why didn’t you get on and wargame after your afternoon snooze?’ nobody asked. Well that was because of a delayed anniversary dinner. Can’t beat that for an excuse.

Saturday, 15 February 2020

It's coming at last!

KUNERSDORF! Finally on the table. Baron von Münchausen's view from his balloon above the Oder in his escape from besieged Frankfurt.

The main Russian position. The Observation Corps on the Mühlberg to the north (top). Prussians appearing from the top.

The southerly end of the position. Austrians towards the bottom left. In the bottom left corner is the Wagenburg.

Frederick's army approaches the Mühlberg. It's going to get very hot soon.

The battery on the Grosser Spitzberg, village of Kunersdorf in the background

Back after a long lay off. Illness and a subsequent loss of my mojo, football watching, spousal and parental responsibilities have all taken their toll on wargaming in Schloß Nundanket. I should get down to the game tonight and hopefully write it up tomorrow.

It took quite a long time to set up the table (3 hours). I took some time to get the dimensions right, using one of the maps from Kronskaf for the overall positions and Duffy (see previous post on Kunersdorf) for the placement of the different troop types. I don't have sufficient Russians for the Observation Corps musketeer regiments so have used Bavarians and Austrians. And I'm a few bases short of Prussian fusileers so have had to use musketeers - must remember this when the game starts.

Table layout with some key dimensions. Had to use a photo of the file on my laptop screen because Blogger wouldn't accept a pdf file of it.