Having laid out his plan, the King set his forces in motion on the plain in front of the Austrian positions. It took some hours for the various Prussians columns to get in position. Their approach was hidden by the early morning mist and the large screening forces. Ever since 2 o'clock the Austrians could hear that the Prussians were on the move on both sides of the Moldau. What wasn't clear is what their intentions were. With Schwerin crossing from east to west, and some movement in Frederick's army also in a westward direction, one possibility was that the Prussians were heading to western Bohemia, possibly to secure Karlsbad and Pilsen. It wasn't until the Prussians were close to the Scharka stream that the visibility was good enough for Charles and von Browne to see what the Prussians were up to and they were finally able to comprehend that they did intend to attack.
Charles soon saw the danger of his position, with attacks coming all along his line and around his left flank by superior forces. The best course of action, he deduced, was to retreat into the city, making a fighting withdrawal to preserve as many of the Empress' soldiers as possible.
 |
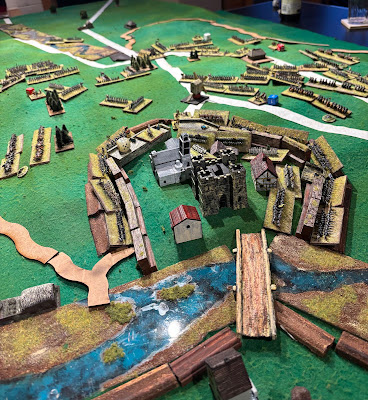
| The Prussians (below and left of the blue line) are across the Scharka all along its length. On White Mountain (the near end of the ridge) two Austrian cavalry brigades have retreated after attacking a massive column of Prussian infantry. |
 |
| Winterfeld attacks the northern ridge |
 |
| View from behind the Austrian right flank. Schwerin's force advances across the Scharka and up the ridge. |
 |
| Schwerin's massed batteries have taken out the Austrian artillery to the left of the hamlet. |
 |
| Whilst the right wing holds off Schwerin, columns of Austrian infantry from the centre and left march to the safety of the city |
 |
| Masses of Prussian infantry march up the White Mountain which has been vacated by the Austrian cavalry (bottom of picture) |
 |
| An Austrian battery on the left of the northern ridge has been caught by the Freikorps whilst it was trying to get away. A regiment of Grenzers to the right of the Freikorps will attack out of the village to get some revenge. |
 |
| Austrian positions (below the blue line) are getting more compact as they are squeezed by the advancing Prussian. Many Austrian infantry units are already lining the covered way of the city. |
 |
| View from the eastern side of the city across the Moldau. |
 |
| Bird's eye view at the end of the battle. The Austrians have lost several units, the Prussians only one. But at least the majority are saved to fight another day. |
 |
| View towards Prague from behind the victorious Prussians |
The Toll
Prussian losses were light:
- Only 1 unit completely lost - the Freikorps.
- 1 grenadier unit took 2 hits (1 hit left)
- 2 musketeers units took 2 hits (1 left each),
- 1 infantry took 1 hit (2 left),
- 1 cuir took 1 hit (1 left)
- 1 dragoon took 1 hit (1 left)
The Austrian losses were heavier. The following units were lost completely
- 3 units of infantry
- 1 unit of Croats
- 2 units of hussars
- 2 units artillery
Plus the following hits:
- 2 infantry units took 1 hit each
- 2 cavalry units took 1 hit each
However, the pontoon bridge across the Moldau has been destroyed by Königsegg after his victory*, so the Prussians will have to cross at the next crossing point downstream.
* I diced for this after the Prosek action.
The wider picture.
Moritz' little corps, as we have seen, was crushed at Prosek east of Prague. Only 1 unit of musketeers escaped and Moritz lost his head. Literally. Königsegg's force came out unscathed having secured the eastern flank of the city, for now.
Further afield, Keith was three marches away from Prague at Jung-Bunzlau. Prince Wilhelm was still stuck in Dresden with his 2nd and 3rd rate troops. News was expected of Prince Henry's force in the Königgrätz area.The Prussians knew that Serbelloni with the second largest Austrian army was also at Königgrätz, Charles was holed up in Prague and Königsegg's small force was outside to the east of the Moldau.
What next in the game?
First I had to dice for recovery of troops following battle. As the losers in each action were effectively pursued, they could not dice to recover any lost units. The main Prussian army could however, dice and they did so successfully bringing back two bases, i.e. the Freikorps unit routed by the Grenzers. All other losses are considered permanent as far as this campaign is concerned.
All forces that were involved in battle this turn have to wait out the next turn whilst they recover. This affects Serbelloni, Königsegg and Charles on the Austrian side, and Frederick/Schwerin and what's left of Moritz's force on the Prussian side.
Having enjoyed a greater movement rate in the first 3 turns, the Prussians now drop down to the same rate as the Austrians: 2 marches a turn. With the requirement to halt for a turn and the bulk of their forces to the west of Prague, the Prussians' freedom of manoeuvre will be limited. With the next crossing of the Moldau some way to the north, this further slows down the Prussians. The Austrian losses in Grenzers and hussars will be a problem for them scouting in the future. The Prussians will have a distinct advantage in the war of outposts. When they get moving again.


For a large and complex battle Chris that was very well explained! At 6mm the blue demarcation lines helped visualise the situation too.
ReplyDeleteAh cheers Mark! When I looked at the first picture I saw it was difficult to tell the difference even between dark blue and white so I thought some kind of visual aid was necessary. That’s a lesson in visibility on the battlefield! Imagine what it would be like without the balloonist’s view.
DeleteI did try adding arrows but it was too busy.
Chris
Really enjoyed the report and pics.
ReplyDeleteCheers Richard. Appreciate it.
DeleteChris
Oh well, another loss for the Austrians:(! One always lives in hope;). A really nice game and good to see how this affects the overall campaign too.
ReplyDeleteHi Steve, a loss for the Austrians, but they live to fight another day. I might do a post musing on the campaign so far and choices facing the Prussians.
DeleteGreat game and report. Very impressive setup. Thanks for sharing.
ReplyDeleteThanks Roger. Appreciate the feedback.
DeleteThanks for this, a great report! I think this shows the additional dimension that campaigns add. If this had been a one-off battle game, the Austrian general would have stood and made a fight of it, and probably had his army destroyed - but in a camaign, he does the sensible thing and withdraws in the face of superior force , which is entirely correct. .So we Prussians inflicted some casualties, cleared the west bank of the river, but did not decisively defeat the Austrian army. So we have to think, what now? Which is what it's all about.. Good stuff!
ReplyDeleteThanks David. It does show what a difference a campaign setting makes. I was very tempted to make the Austrians stand and fight it out. Looking at the dispositions the three of you came up with, I don't think there was much of a chance for the Austrians unless they could knock out one Prussian wing in a fluke result.
DeleteBut it does leave you guys with some tricky decisions what to do next.
PS I meant to say that in the first few turns you guys 'played a blinder' getting that concentration of forces together around Prague, whilst tying up Serbelloni's sizeable force with Henry's small corps.
DeleteLovely looking table, it's great! The narrative is good too, Austrians being sensible as I don't see what else they can do under the circumstances!
ReplyDeleteBest Iain
Thanks Iain. Jon and the Daves came up with a good tactical plan and added to their advantage in numbers & quality, discretion was the better part of valour* for the Austrians.
Delete* I prefer Roger McGough’s version “Discretion is the better part of Valerie, though all of her is nice.”
Chris