Friday, 16 August 2024

Dettingen - Take II - Conclusion

I left the game at the point were both sides were finally confronting each other across the streams. It took six turns (about an hour of play) to get to this position. I played another 14 turns in 2 hours tonight and reached a conclusion.  The following pictures illustrate what happened.

After 8 turns Hanoverian cavalry crash into the Gardes Fraincaises. British dragoons (including the famous Scots Greys, bottom) are about to charge the next French brigade along.

Another view of the same. The cotton wool 'smoke'* by the white coated infantry top left (Austrians) indicates that they have come under long-range artillery fire and must test to move the next turn.

* This is doubly appropriate because 'bavovna' is Ukrainian slang for explosion (literally 'cotton') - click here for the meaning of Bavovna

Two turns on and not much appears to have happened. Both sides are proving very resilient.

Next turn losses begin to appear. The first of the game inflicted on the French. In the background the Hanoverian cavalry have been replaced by Austrian infantry in the front of and flank of the Gardes.

Wider view of turn 11. A British brigade has attacked Dettingen (middle) and has inflicted a loss on the French defenders. 3 losses results in the removal of an infantry brigade.

Next turn, allied cavalry under the Duke of Cumberland have charged the French outside Aschaffenburg. Only 1 loss was inflicted on the French who had secure flanks and support behind.....but no where to retreat to if pushed back! Eventually one allied brigade was destroyed and one pushed back, to the relief of the French.

Same turn, after more losses, one French brigade has been withdrawn from the front line. The Garde is being whittled down. Clever substitution of brigades by the allies kept the pressure on the French. But cavalry is brittle in TOTSK - a unit can stand only 2 losses, so they are a risky tool to use.

This was a slow slog, but after a few more turns (see black die) gaps have appeared. Meanwhile the Maison du Roy, led by the impetuous Grammont has charged the British outside Dettingen. The British, supported by guns will see the Maison off (hurrah!) but look at that dense column of French cavalry following on behind.

4 turns later and the allies losses on their front formation have reached 50%, and the wing morale test was failed at the first attempt. Hence the gap that has appeared between the opposing sides. The allies have strong infantry forces, supported by guns, left, and Grammont's wing can only take one more unit loss before they too have to take a test. Several units of Grammont's wing are on two losses, so they are close to the edge too. But there is still a strong force of French cavalry and infantry blocking the route down the Main.  I decided to call it for the French. A close victory.

Back in the centre, the allies' baggage train is lagered-up - thus starting a long British tradition on the Continent!

The whole field at the end. In the foreground can be seen the large French force that crossed at Aschaffenburg (8 brigades!). Two brigades of allied cavalry under Cumberland are conducting a delaying withdrawal.

French losses: 1 brigade of cavalry and two of infantry. More brigades are teetering on the brink.

Allied losses: 4 brigades of cavalry and 3 of infantry (including the remains of the formation which collapsed).

So what played out differently to the previous game? Well I attacked more vigorously with Grammont's wing. As things panned out, they were successful with action tests which allowed units to be positioned well and avoid being beaten piecemeal.  The allies struggled to bring their numbers to bear at the crucial point, before French reinforcements arrived. There simply wasn't the space. Had the French suffered a wing loss first I would have been more tempted to carry on. If Grammont's wing collapsed soon after turn 20, the allies were still facing a strong force of balanced horse and foot, whereas they were deficient in cavalry, so it would have been a less than 50% chance of the allies winning IF Grammont collapsed soon. 

I need to think carefully before giving this another go. Can the allies win?

Thursday, 15 August 2024

Dettingen - Take II

I finally got down to starting the second go at Dettingen late this evening. I made two tactical changes from the previous time:

I decided that Grammont's wing would get stuck in as soon as possible and in whatever order troops could get there - out would go any cautious approach of making sure flanks were covered. Brigades would be thrown in any how, just to get a march on the allies.

The second was to hold the allied cavalry rearguard further up the field, just to see what effect giving the French a free hand coming through Aschaffenburg, but not spend command resource on manoeuvring the cavalry.

So I got 6 turns in, in about an hour, and the pics below show a few points along the way.

After 2 turns the allies are marching away from the Main, under French artillery fire. The French have been quite successful, inflicting 3 hits on different allied units.

At the same time one of the French divisions has been able to form into column and march towards Aschaffenburg (off picture to bottom left) but the other has stalled (top right). The local commander was struggling to get his men organised (i.e. they failed action successive tests).

Meanwhile, Grammont;s infantry has got moving to the first stream (top) with Dettingen to the top left of the picture. Grammont's cavalry is formed up into columns to sweep around the left flank of the infantry.

After 4 turns, the Pragmatic army hasn't yet shaken themselves out into line. A traffic jam is beginning to form as the rear columns converge with the baggage train. French infantry, cavalry and dragoons march off towards and over the bridges downstream of Dettingen (top left).

Overall situation after 6 turns. Between Dettingen and the wooded hills, the allies have got into line in time, as Grammont's wing bears down on them (top). The traffic jam has not yet cleared in the allied centre-rear, whilst 3 cavalry brigades are ready to form a rearguard action. At the bottom, French infantry columns snake either side of the Main with Aschaffenburg in the bottom right).

A closer view of the impending clash, after turn 6. Things are set for the first proper confrontation of the battle.


Wednesday, 14 August 2024

Operational Challenges of the AWI

The following video came up in my YouTube feed. It's long, at 80 minutes, and a bit dry at the start, but it's well worth persevering with in my opinion.

https://www.youtube.com/watch?v=yoAHlGDjINI&t=1406s

There are five speakers, who are amongst the contributors to a Helion book (Casemate in the US) called: aging War in America, 1775-1783: Operational Challenges of Five Armies. There's a discount code in the notes for Casemate for 25% off. I don't know if there's a similar discount for Helion. I've seen/heard/read some of the speakers before. Don Hagist wrote another Helion title on British flank companies/composite battalions, Alex Burns contributed to and edited the The Changing Face of Old Regime Warfare: Essays in Honour of Christopher Duffy (Helion Press, 2022), and I've seen Todd Braisted talk on Loyalists on another YouTube channel - Redcoat History.

Amongst the surprises to me was the extent of conscription in the US forces during the war, and how little the French fought in open battle (their main, and decisive, action being the siege of Yorktown). So I won't be recruiting any of Rochambeau's army any time soon! Oh, and one more, was how the Brunswickers adopted the British two-rank, loose files doctrine unlike the Hessians. So some re-basing is due, I think! 

I nearly titled this post War in America, but thought it might attract more hits than I would want. At least from quarters I don't want hits from, given the somewhat febrile nature of politics currently.

Monday, 12 August 2024

A bit of a ramble and a bit of a rant.

No pottery wheel I'm afraid (reference for Brits of a 'certain age').


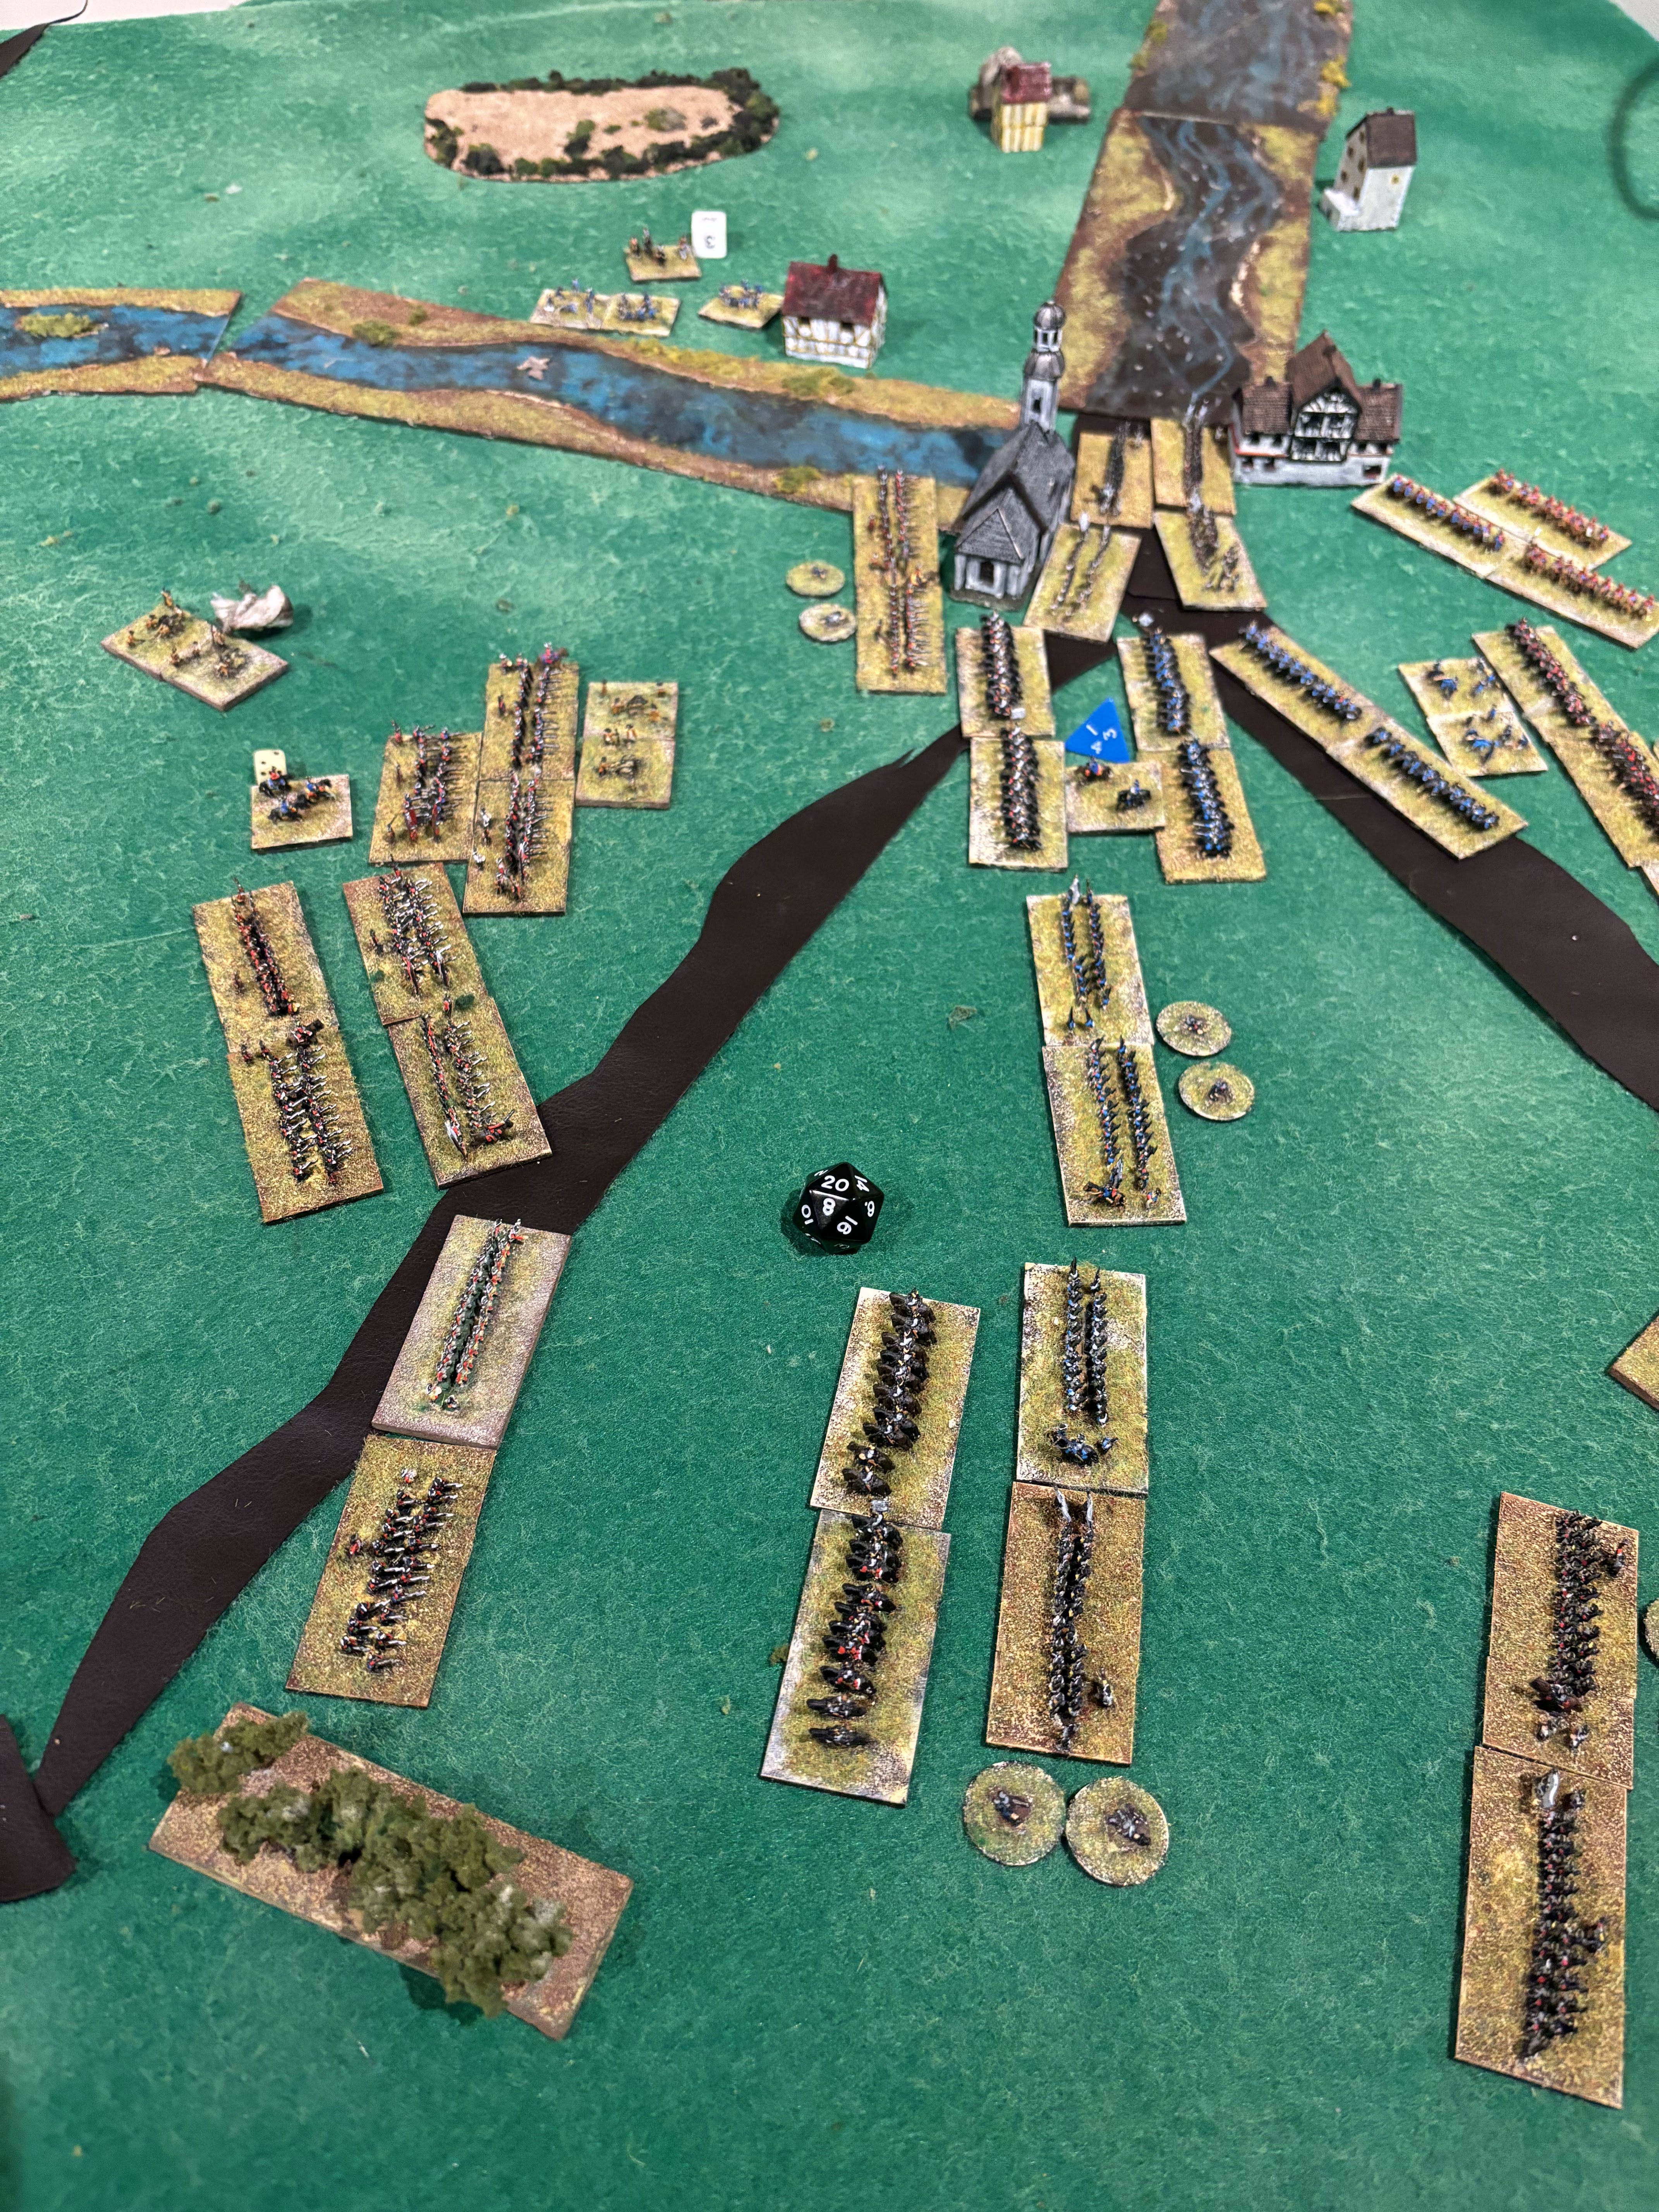
I set-up the table for Dettingen, Take 2, on Friday but haven't got around to playing it yet. Maybe Monday evening? Saturday saw a slow start, then chores, then listening to a disappointing first game of the season in the Trawler Town Derby*.  In the evening the Margravina suggested a BBQ using the small fire-pit. After eating the 18 year olds disappeared off to a party leaving the M and I to poke the embers of the charcoal and add small logs as the sun went down. It's amazing how much time you can waste this way. Lovely!

On Sunday, after another late start, the M and I went for a walk that I'd promised. The plan was to get the bus down to Kingston, walk the Thames path to Richmond and get the bus back. You know the cliché about plans not surviving first contact with the enemy? Well the enemy in this case was unknown at this stage, but the bus driver announced it was stopping on Kingston Hill. So rather than walk on the main road to the Thames, we opted to change our plan and head for Richmond Park, walk through there, and meet the river at Petersham, then walk to Kingston via the river.

Now the walk was pleasant, if a bit hot, and the populace was out in great numbers. Folk were paddle boarding, and canoeing, and even swimming. No photos I'm afraid. We were walking at a brisk pace. By the time we got to Kingston, we were ready for something to eat and drink so we stopped at a kiosk in Canbury Gardens (a park by the river). Revived, we walked on to the town centre for the bus home. 

The rough route of the walk (excluding getting to and from the bus at the start and end).

The bus journey home was severely delayed due to Thames Water (privatised profit, socialised risk). Very frustrating.

Overall length of walk around 10km. Not bad on a hot day. This probably had a lot to do with why I had a snooze on the sofa after a shower. In the afternoon the Margravina and I discussed plans to raid the state treasury, but they didn't lead to anything. 

Frustrated in one direction, I took action to expand the state's forces and, as encouraged by certain bloggers, I've ordered enough figures from H&R for 10 more infantry brigades, 2 cavalry brigades and 2 batteries. Some will go to plug gaps in the Hanoverian ranks, and others to boost the Sardinian and Spanish ranks. I still have to paint the Carthaginians I ordered a few months ago. This is most like me, building up the lead pile like this.

Thursday, 8 August 2024

Disaster on the Main

I completed the first run through of Dettingen earlier. It took me a few 1 or 2 hour sessions. I seem to have lost most of my photos. God knows how that happened. There won't be much of an account because photos normally act as an aide memoire for me. So here, in brief, is what happened. Notes explaining points about the rules are given in italics.

A reminder of the initial deployment.

And what the table looked like. Allies in the large block in the centre. French positions describe an elongated C on the other side of the Main.


The Pragmatic Army started off well. They began to deploy into several lines from their march columns by the river. In doing so they were annoyed, but only hampered a little by the French guns on the left bank. In Twilight of the Soldier Kings (TOTSK), outside short range artillery can only disrupt enemy movement (by forcing them to take an 'action test'). The French advanced force, lying across the allied line of march, reacted in a disjointed fashion. Under TOTSK, anything but a straightforward movement requires an action test to be taken and as they had to cross two streams, there were a lot of tests needed. General figures can allow retakes for any units they're attached to - provided they have command value above zero, which the GOC Grammont didn't have. In the real battle he was having a bit of an off day so I decided he would be rated as Poor.

Also, the Hanoverian artillery was having an excellent time, firing at close range causing losses successively to the Maison du Roy and the Gardes Francaises. The latter were finished off by British infantry. The Maison had to retire out of harms way, otherwise the ladies of the court at Versailles would have no beaus left to dance with at the palace balls. As well as the foot guards, two other French brigades (one foot and one horse) were ruined before the allies began to take losses.

Whilst this was happening, the King, George II, sent his young son the Duke of Cumberland off with 3 brigades of cavalry to harass and delay the French rearguard and prevent them from attacking the allies from behind. The young prince did so successfully, and the French were kept pinned in the environs of Aschaffenburg all battle.

Cumberland with one of his brigades blocking the French infantry near Aschaffenburg.

Meanwhile the baggage train was sent to lager up by the wooded hills, far from the French artillery. For his part, the overall French commander, the Duc de Noailles, rushed his main force towards the bridges at Selligenstadt to second Grammont.  After seeing the household troops badly mauled, and co-ordinated all-arms forces bearing down on him, Grammont started to become more cautious. He ordered a withdrawal so his forces would still be able to put up a fight when the reinforcements arrived.  Unfortunately by the time reinforcements arrived, Grammont's command was badly battered and morale completely collapsed. With half his units removed from play, Grammont's wing had to take a Wing Morale test. The first one was passed, but next turn the test was failed.

The large Guards Brigade (British and Hanoverian) is attacking Dettingen on the left. Between the two streams the allies attack the French (coming down from the top of the picture. A lengthy cavalry melee is taking place, centre right, with the French having the upper hand on account of numbers and weight. More French cavalry approach the allied cavalry from the right. Round bases are loss markers.

The Guards continued to attack Dettingen, which was defended with vigorous by the French. Casualties began to pile up outside the village. Attack after attack achieved nothing.

Between the streams, the French cavalry saw off both remaining allied cavalry brigades, leaving the flank of the infantry exposed. The allied infantry could do little to avoid the inevitable. Soon the inevitable happened and the foot were swept away. This provoked a chain reaction and the entire wing broke. As with Grammont's wing, the losses amounted to half the command, and on the first attempt, the Wing Morale test was failed. The King had two brigades of infantry held in reserve, but they were too far back to influence matters. Whilst technically the allies had two formations remaining and could have fought on,  they were two small to punch a hole through the French lines by Dettingen. Waiting for another wing failure was just postponing the inevitable so I called the game.

The successful French horse bear down on the allied infantry.

The King's reserve. Beyond the stream.

One final allied foot brigade broke, and then the whole wing melted away. The King could not break out of the trap and would have to ask for terms.

So this was something of a reversal of history. Without knowing what happened, a look at the map of the initial deployments might have led you to conclude that the allies would lose. So to that extent the outcome is not surprising.  Having got the table set-up, I will run this at least one more time. Before that, I'll reflect on what I could do differently, for both sides.

Incidentally, I didn't have enough Hanoverians, so I drafted in some British infantry and Austrian cavalry. I'm a bit short of Spanish and Piedmontese. Maybe I need to place a new order.

Wednesday, 7 August 2024

Saturday, 3 August 2024

Dettingen Set-up

It took me a couple of hours to set-up, what with measuring and whatnot, but I got there.

King George has left his carriage to join Arenberg and their respective staffs, following the sound of French guns firing from across the Main

Allied baggage train in the centre of the column

Grammont’s blocking force beyond Dettingen

View of the whole array. Aschaffenberg with bridge bottom right.the Pragmatic Army between the Main and the wooded hills, the French main force along the left bank and Grammont in the far distance.